Needle Knot
Needle nail variant
Fly-line to leader transition with a needle-assisted path for a smooth, low-profile join.
Line-to-line · Intermediate · Fly line / Monofilament / Fluorocarbon · 5 steps
ApplicationsHow to tie itFinished structure
No drawing of this exact knot yet. The written steps are the reference.
- Diagram in reviewA drawing of the Needle Knot itself is being made. Until then, follow the written steps.
Step 01
Push a needle slightly wider than the leader butt into the centre of the fly-line tip, about 3 mm deep, then out through the side. Leave it there briefly to open the hole.
No drawing of this exact knot yet. The written steps are the reference.
You should now seeThe needle entering the centre of the fly-line end and coming out of the side a few millimetres back, with the coating intact around it.
If it goes wrongPushing the needle in off-centre or too far, so it splits the coating or runs deep into the core. A split in the coating is easy to see at the tip.
Fix: Pull the needle out, cut off the damaged tip of the fly line, and make a new channel in the fresh end.
Why: A short centred channel lets the leader leave the fly line in a straight line. A torn coating leaves a weak spot that the wraps cannot cover.
- Diagram in reviewA drawing of the Needle Knot itself is being made. Until then, follow the written steps.
Step 02
Remove the needle and feed the thin end of the leader into the side hole so it comes out the end of the fly line. Pull the leader through until about 20 cm (8 in) remains outside the side hole.
No drawing of this exact knot yet. The written steps are the reference.
You should now seeThe leader coming straight out of the fly-line tip, with about 20 cm (8 in) of butt standing out from the side hole.
If it goes wrongFeeding the leader into the tip end instead of the side hole, or waiting until the hole has closed. The leader buckles and will not come out of the other opening.
Fix: Push the needle through again to reopen the channel, then feed the thin end of the leader into the side hole straight away.
Why: The thin end fits the fresh hole easily. Pulling the whole leader through leaves the thicker butt outside the hole, and that is the part used for the wraps.
- Diagram in reviewA drawing of the Needle Knot itself is being made. Until then, follow the written steps.
Step 03
Lay a smaller needle, a nail or a toothpick along the fly line. Wrap the leader butt five times around the fly line, the tool and the leader itself, working toward the end of the fly line.
No drawing of this exact knot yet. The written steps are the reference.
You should now seeFive wraps lying side by side over the fly line and the tool, each one touching the last, with the butt leaving the wrap nearest the fly-line tip.
If it goes wrongWraps crossing over each other or leaving gaps, or wrapping away from the tip. A crossed wrap shows as a ridge and the coil will not close evenly.
Fix: Unwind to the first clean wrap and lay the rest again, pushing each one against the last as you move toward the fly-line tip.
Why: The tool holds a channel open under the wraps. In the next step the butt goes back through that channel.
- Diagram in reviewA drawing of the Needle Knot itself is being made. Until then, follow the written steps.
Step 04
Pass the leader butt back under the five wraps through the space left by the tool, in the opposite direction to the wraps. Remove the tool and pull the butt snug.
No drawing of this exact knot yet. The written steps are the reference.
You should now seeThe butt coming out from under the far end of the coil, the tool gone, and five snug wraps still in place on the fly line.
If it goes wrongPulling the tool out before the butt is through, so the channel closes. The butt jams against the first wrap and will not go under.
Fix: Unwind the wraps, lay the tool back along the fly line, wrap again and pass the butt through before taking the tool out.
Why: Running the butt back under its own wraps traps it, so pulling on the leader tightens the coil instead of unwinding it.
- Diagram in reviewA drawing of the Needle Knot itself is being made. Until then, follow the written steps.
Step 05
Pull the slack out of both lines and work the wraps along the fly line until they reach the side hole. Pull very tight, then trim the butt close to the wraps.
No drawing of this exact knot yet. The written steps are the reference.
You should now seeA smooth coil of five wraps sitting right at the side hole with no gap between them, and the butt cut short against the last wrap.
If it goes wrongPulling the knot tight before the wraps reach the side hole, leaving a gap between the coil and the hole. The leader bends where it leaves the fly line.
Fix: If the coil has set away from the hole and will not slide, cut it off and tie it again, working the wraps down before the hard pull.
Why: With the coil at the hole, the leader runs from inside the fly line straight into the wraps, so there is no loose hinge between the knot and the exit.
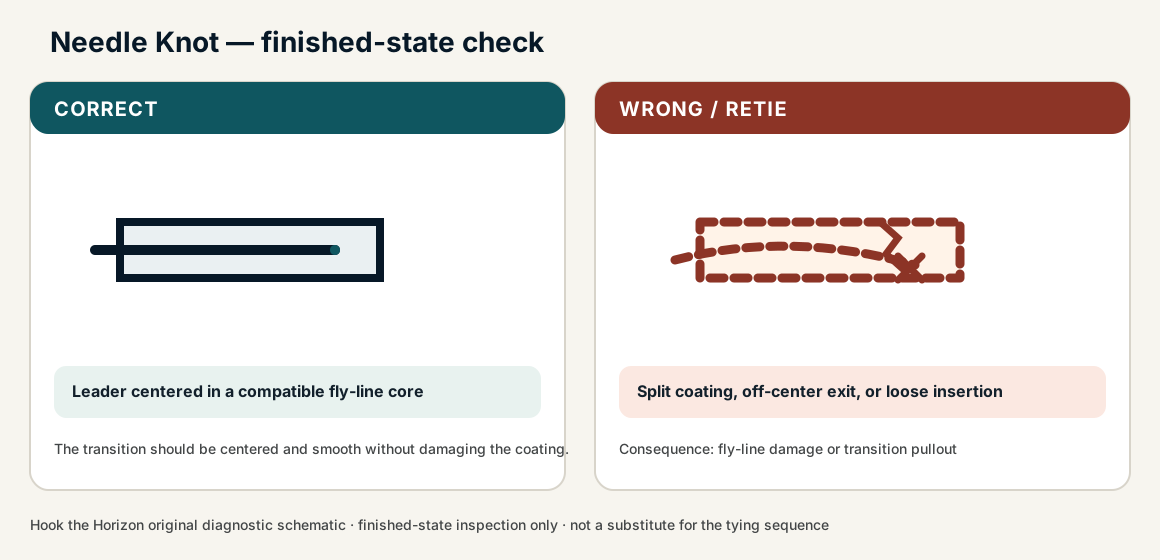
Needle Knot — finished-state checks, on the shared reference layout
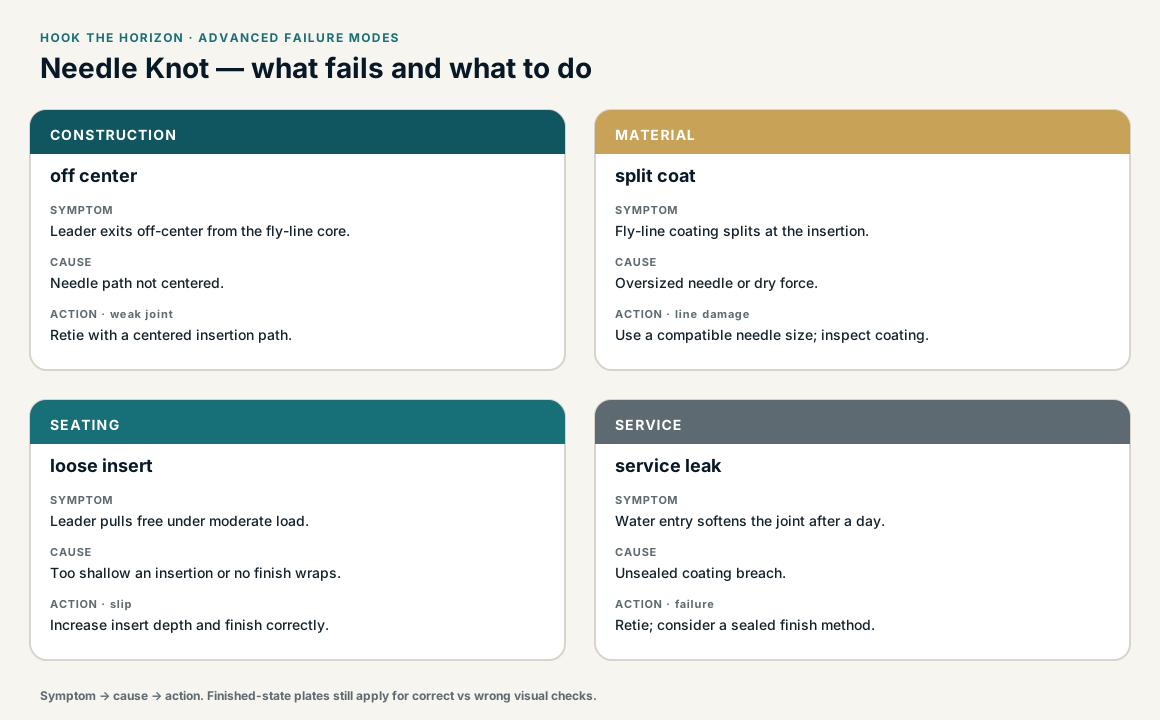
When this family fails, it fails as these. The recovered end still outranks the name.
Needle Knot — what fails and what to do
Fine tippet at the eye, or fly-line to leader with a tube or nail.
- !Hitch path around the eye instead of through it
- !Single pass where two were the job
- !Gap at the tube or nail on a fly-line join
- !Coating split by the needle, leaving a weak spot the wraps cannot cover
- !Butt not passed back under the wraps, so the coil unwinds when the leader is pulled
- !Wraps crossed or gapped, so the coil does not close evenly
- !Coil set away from the side hole, so the leader bends where it leaves the fly line
Gapped wraps on the fly-line tip
Leader slides off the coating
The coil must sit even on the fly line, not in the air · step 02
Shallow needle path or coil not on the fly line
Walks out of the coating
Insertion depth is the trap; a surface coil is a Nail Knot without the nail · step 01
Needle nicked the core
A dead fly line — not a knot you can dress out
Core damage is a cut-off, not a retie of the same coil · step 01
Leader slides off fly-line tip
Check
- ?Coil uniformity on tip
Then
- →Retie
- →Confirm needle path did not cut core
Leader exits off-center from the fly-line core.
Check
- ?Look for: Leader exits off-center from the fly-line core.
Then
- →Retie with a centered insertion path.
Fly-line coating splits at the insertion.
Check
- ?Look for: Fly-line coating splits at the insertion.
Then
- →Use a compatible needle size; inspect coating.
Leader pulls free under moderate load.
Check
- ?Look for: Leader pulls free under moderate load.
Then
- →Increase insert depth and finish correctly.
Water entry softens the joint after a day.
Check
- ?Look for: Water entry softens the joint after a day.
Then
- →Retie; consider a sealed finish method.
Finished check failed — leader is forced into incompatible construction
Check
- ?leader sits centered in a compatible fly-line core
- ?core/coating is not split
- ?external securing turns are compact and smooth
Then
- →Retie. fly-line damage or transition pullout.
Gapped wraps on the fly-line tip
Check
- ?Leader slides off the coating
- ?Inspect step 02
Then
- →Retie. Do not dress a defective structure and call it seated.
Shallow needle path or coil not on the fly line
Check
- ?Walks out of the coating
- ?Inspect step 01
Then
- →Retie. Do not dress a defective structure and call it seated.
Needle nicked the core
Check
- ?A dead fly line — not a knot you can dress out
- ?Inspect step 01
Then
- →Retie. Do not dress a defective structure and call it seated.
Same failure class, different geometry. Open the plates — Diagnose still starts from the symptom.
Not ideal for
- ×Braid-to-leader offshore joins
- ×No-tool bankside reties