Nail Knot
Tube knot · Needle knot variant
Joining a leader to the end of a fly line with a smooth, compact coil of wraps that passes through the rod guides. Tied around a small tube or nail.
Line-to-line · Intermediate · Fly line / Monofilament / Fluorocarbon · 4 steps
ApplicationsHow to tie itThick fly line meets a thinner leader; even wraps transfer onto the fly-line tip.
Finished structure
Thick fly line meets a thinner leader; even wraps transfer onto the fly-line tip.
step 01 · schematic Thick fly line butted to the thinner leader.
Step 01
Lay a tube or nail along the end of the fly line, then lay the butt end of the leader against both, with about 25 cm (10 in) of leader tag running up along the fly line.
Thick fly line butted to the thinner leader.
You should now seeFly line, tube and leader pinched side by side, the leader tag pointing up the fly line away from its end, and the tube reaching past your pinch.
If it goes wrongA gap between the tube and the fly line, or too short a leader tag. The wraps will not lie tight, or the tag runs out before the wraps are done.
Fix: Pinch the three together again with the tube tight against the fly line, and slide the leader along to give a longer tag.
Why: The tube holds a channel open under the wraps so the tag can be passed back through them. Without it the wraps close on themselves before the tag can go through.
step 02 · schematic Even wraps transfer onto the fly-line coating.
Step 02
Pinch about 2.5 cm (1 in) from the end of the fly line and wind the leader tag back over itself, the fly line and the tube, working toward the end of the fly line, for about six wraps.
Even wraps transfer onto the fly-line coating.
You should now seeWraps lying side by side over the fly line, leader and tube, held firm under your fingers, with the tag coming off the wrap nearest the end of the fly line.
If it goes wrongWraps that cross or leave gaps, or loosening your pinch between wraps. You see fly line showing between turns, or a wrap riding over its neighbour.
Fix: Unwind to the last tight wrap and carry on, keeping the finished wraps pinched hard while you lay each new one against the last.
Why: Wraps that sit side by side grip the fly line along the whole coil. A crossed wrap bulges and leaves the turns next to it loose.
step 03 · schematic Tag tucked; no fly-line coating stripped.
Step 03
Keep pinching the wraps and push the leader tag through the tube so it runs back under them. Pull the tube out away from the end of the fly line, then pull the tag gently until the wraps snug down.
Tag tucked; no fly-line coating stripped.
You should now seeThe tag coming out from under the wraps, the tube gone, and the wraps closed down on the fly line and leader in an even coil where you wound it.
If it goes wrongPassing the tag outside the tube instead of through it, or letting go of the wraps as the tube comes out. The tag lies on top of the coil, or the wraps spring loose.
Fix: If the wraps have unwound, go back to step 2 and wind them again, then run the tag through the tube under the wraps.
Why: Orvis alternates between pulling the tag and the standing part of the leader, a little at a time, until the turns are snug. Tightening gradually keeps the coil even.
step 04 · schematic The join should be a smooth taper, not a lump.
Step 04
Pull both ends of the leader tight, then pull the fly line and the standing leader apart hard to seat the knot. Trim the leader tag and the end of the fly line close to the knot.
The join should be a smooth taper, not a lump.
You should now seeA slim, even coil bedded into the fly line, the leader leaving it in a straight line with the fly line, and both ends cut close.
If it goes wrongTrimming before the knot is fully seated, or seating it with only the leader pulled. The coil sits at an angle and the leader leaves it off to one side, or the coil slides along the fly line.
Fix: Test with a hard pull on fly line and leader before cutting anything. If the coil moves or sits crooked, cut it off and tie it again on fresh fly line.
Why: The wraps grip by biting into the fly-line coating, and the final pull beds them in. Orvis describes pulling nearly as hard as your hands can manage.
Nail Knot — finished-state checks, on the shared reference layout
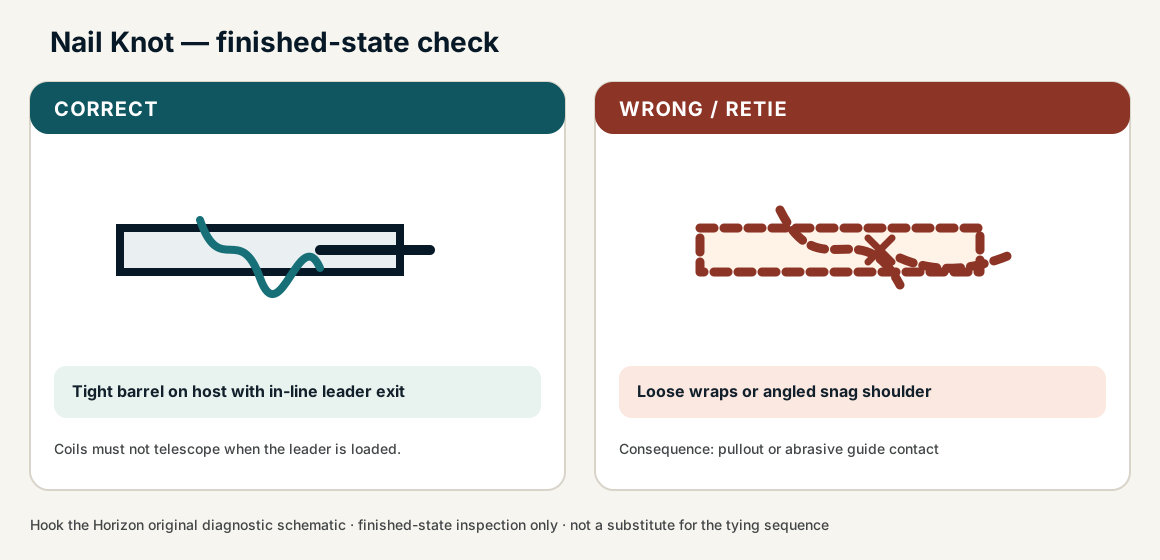
When this family fails, it fails as these. The recovered end still outranks the name.
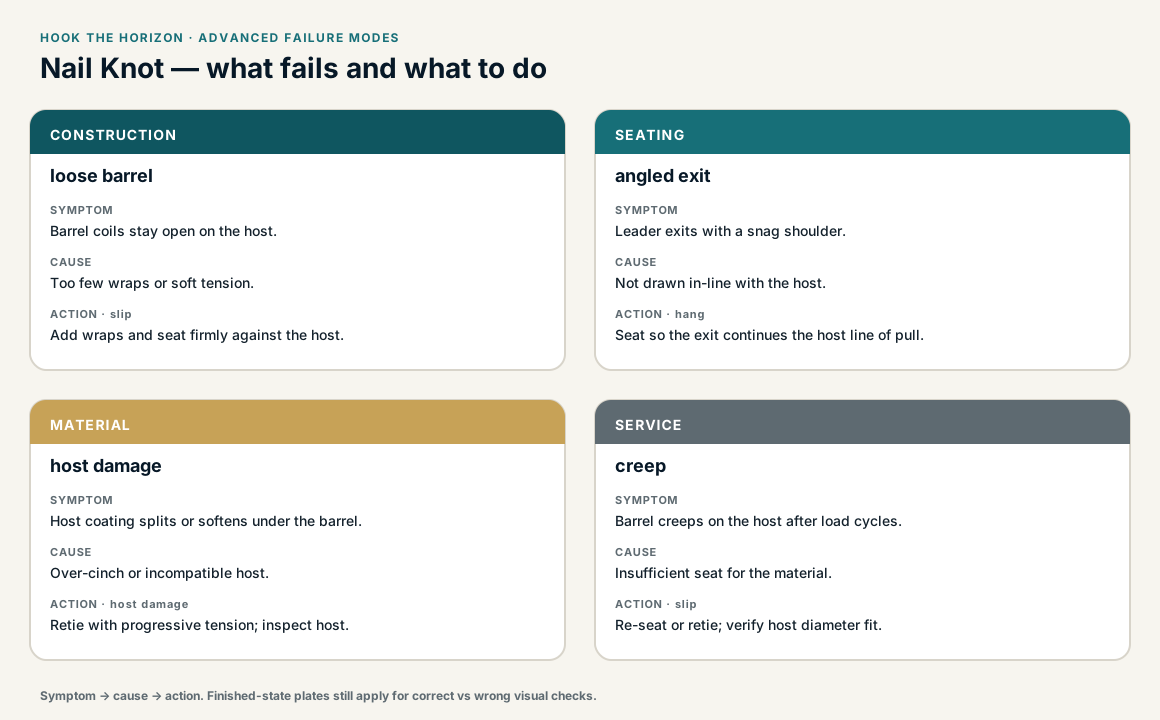
Nail Knot — what fails and what to do
Fine tippet at the eye, or fly-line to leader with a tube or nail.
- !Hitch path around the eye instead of through it
- !Single pass where two were the job
- !Gap at the tube or nail on a fly-line join
- !Crossed or gapped wraps, which leave the turns beside them loose on the fly line
- !Wraps sprung loose as the tube was pulled out
- !Seated by pulling only the leader, so the coil sits crooked or slides along the fly line
- !Not pulled hard enough to bed the wraps into the fly-line coating
Gapped coil on the fly-line tip
Leader slides off the coating
Even stacked turns transferred onto the fly line are the grip · step 02
Coil left on the tube, not the fly line
That is not a Nail Knot — it will dump
The transfer off the tool onto the coating is the knot · step 03
Over-trimmed before the seat completed
The coil unravels as soon as the tag is cut
Seat first, then trim; a short tag cannot finish the lock · step 04
Gap between tool and fly-line tip
The coil hangs in air and never bites coating
The nail or tube must sit against the tip · step 01
Leader slides off the fly-line tip
Check
- ?Wrap uniformity
- ?Tag exit
Then
- →Retie with even wraps
- →Seat fully before trimming
Barrel coils stay open on the host.
Check
- ?Look for: Barrel coils stay open on the host.
Then
- →Add wraps and seat firmly against the host.
Leader exits with a snag shoulder.
Check
- ?Look for: Leader exits with a snag shoulder.
Then
- →Seat so the exit continues the host line of pull.
Host coating splits or softens under the barrel.
Check
- ?Look for: Host coating splits or softens under the barrel.
Then
- →Retie with progressive tension; inspect host.
Barrel creeps on the host after load cycles.
Check
- ?Look for: Barrel creeps on the host after load cycles.
Then
- →Re-seat or retie; verify host diameter fit.
Finished check failed — wraps are loose or spaced
Check
- ?barrel wraps lie tightly on the fly line or leader tube
- ?leader exits in line without a shoulder
- ?coils do not telescope when loaded
Then
- →Retie. pullout or abrasive guide contact.
Gapped coil on the fly-line tip
Check
- ?Leader slides off the coating
- ?Inspect step 02
Then
- →Retie. Do not dress a defective structure and call it seated.
Coil left on the tube, not the fly line
Check
- ?That is not a Nail Knot — it will dump
- ?Inspect step 03
Then
- →Retie. Do not dress a defective structure and call it seated.
Over-trimmed before the seat completed
Check
- ?The coil unravels as soon as the tag is cut
- ?Inspect step 04
Then
- →Retie. Do not dress a defective structure and call it seated.
Same failure class, different geometry. Open the plates — Diagnose still starts from the symptom.
Not ideal for
- ×Braid-to-leader offshore joins (use FG / Slim Beauty family)
- ×Equal thin mono tippet joins (Blood / Surgeon)