Improved Clinch Knot
Clinched knot · Improved clinch
Tying a hook, lure or swivel to monofilament line. NetKnots does not recommend it for braid, and it is hard to tie in heavy line.
Finished structure
Drawn from a rope model of this knot: which strand passes over which comes from where the rope actually lies.
- 1Tag end, pulled through2Standing line, to the rod
Move 1 of 1Push the tag through the eye and draw out a hand's width of lineYou should now see: The hook hangs on the line, standing line on one side of the eye, a long tag on the other. Step 01
Pass the tag end through the hook eye and pull through a hand's width of line, enough to make the turns and both tucks.
You should now seeThe hook hanging on the line, with the standing line on one side of the eye and a long free tag on the other.
If it goes wrongPulling through too little tag. You find out partway through the turns or at the second tuck, when the tag will not reach.
Fix: Pull the tag back out and start again with more line through the eye. Forcing a short tag through usually means the second tuck gets left out.
Why: Every turn and both tucks use tag length. A tag that runs short ends up as a plain clinch without the final tuck, and that is the version that slips.
- 1Five turns about the standing line2Small loop beside the eye
Move 1 of 1Wrap the tag round the standing line five times, working away from the eyeYou should now see: An even spiral of five turns, a small open loop between the first turn and the eye, and the tag free at the top. Step 02
Wrap the tag end around the standing line 5 times, working up the line away from the eye and leaving a small open loop just above the eye. Use 4 turns on heavy line.
You should now seeAn even spiral of turns on the standing line, a small open loop between the first turn and the eye, and the tag end free at the top of the spiral.
If it goes wrongTurns that cross over each other or bunch together. You see a lump, or one turn riding on top of the next, instead of a smooth spiral.
Fix: Unwind the tag back to the eye and wrap again, keeping light tension on the tag so each turn lies beside the last.
Why: When the knot is pulled tight the turns roll and change shape around the standing line. Crossed turns press on one spot instead of sharing the grip along the spiral.
- 1Small loop beside the eye
Move 1 of 2Bring the tag back and push it through the small loop beside the eye 1Big loop2Small loopMove 2 of 2Tuck the tag back through the big loop you have just madeYou should now see: Following the tag with a finger, it passes through two openings: first the small loop at the eye, then the big loop. Both loops are still open. Step 03
Push the tag end through the small loop just above the eye. Then tuck it back through the large loop that has just formed between the tag and the turns.
You should now seeFollowing the tag with a finger, it passes through two openings: first the small loop at the eye, then the large loop. Both loops are still open.
If it goes wrongStopping after the first tuck through the small loop. The knot looks almost the same, but it is a plain clinch with the tag passing through only one opening.
Fix: Before putting any pull on the knot, feed the tag back through the large loop. If the loops have already closed, open the knot and make both tucks again.
Why: The second tuck through the large loop is what makes the clinch improved. It traps the tag under its own line, so the tag cannot draw back out through the turns.
Move 1 of 1Wet the knot, draw the turns down against the eye, and trim the tagYou should now see: A neat coil of turns sitting against the eye with no gap, and a short tag standing out beside it. Step 04
Wet the knot and pull the tag end to draw the turns down together. Then pull the standing line so the knot slides tight against the eye, and trim the tag close.
You should now seeA neat coil of turns sitting right against the eye with no gap, and a short tag standing out beside the eye.
If it goes wrongStopping short or pulling fast on dry line. A gap stays between the coil and the eye, the turns still move, or the line looks crinkled after the pull.
Fix: If there is only a gap, wet the knot and finish with a slow, steady pull on the standing line. If the turns are crinkled or will not close neatly, cut it off and tie it again.
Why: As the knot closes, the turns rearrange around the standing line. Water lets them slide into place instead of rubbing and heating the line, which weakens mono and fluorocarbon.
Improved Clinch Knot — construction sequence
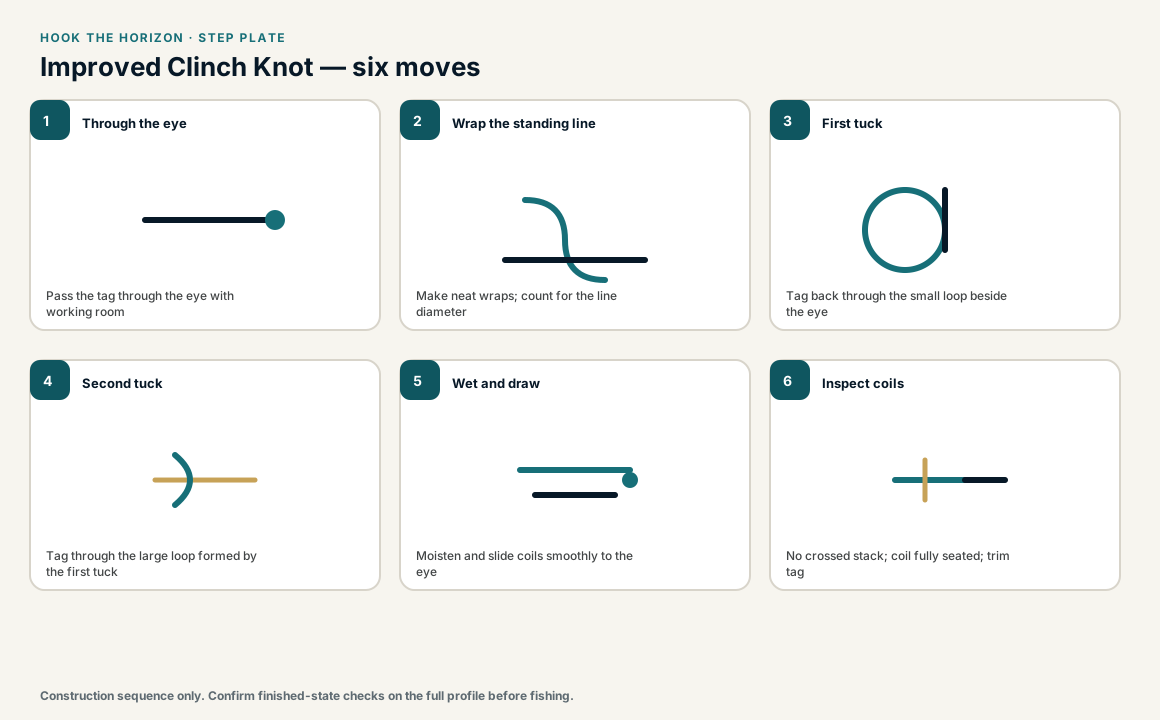
When this family fails, it fails as these. The recovered end still outranks the name.
Improved Clinch Knot — what fails and what to do
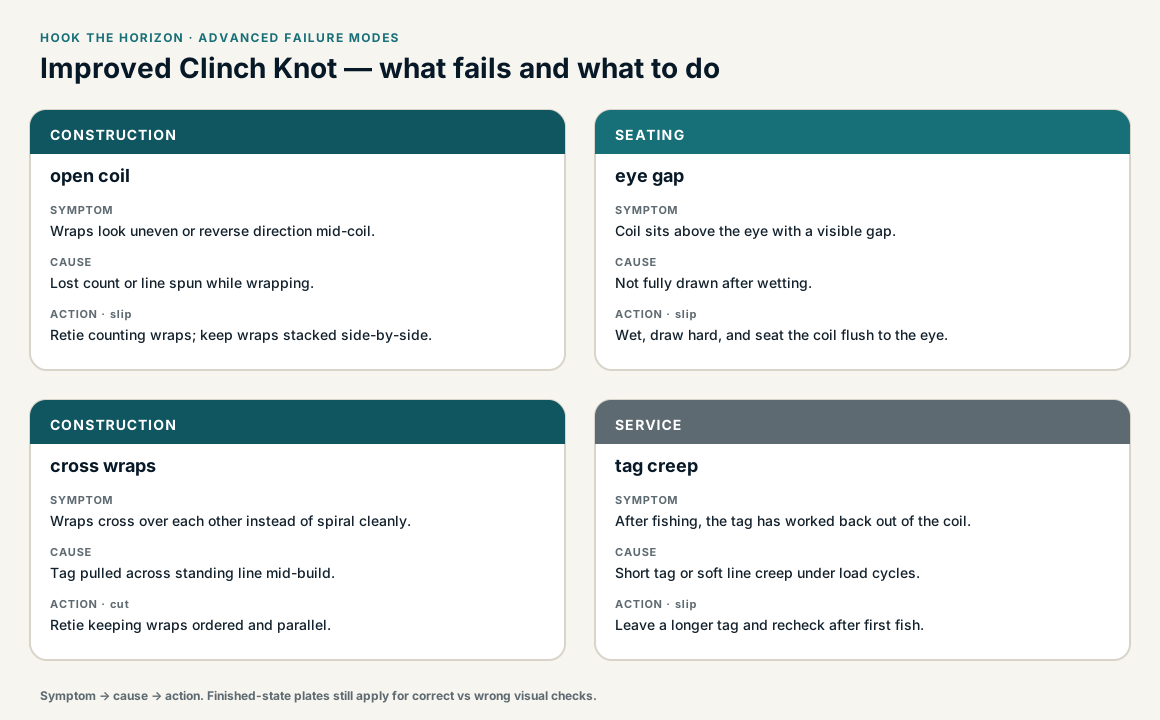
Wraps down the standing part, then a tuck that jams the barrel to the eye.
- !Wraps walked or crossed — load on one turn of the barrel
- !Barrel never jammed to the eye, so the tuck is decoration
- !Tag never tucked, or the extra Improved / Trilene pass missing
- !Tuck through the large loop left out, leaving a plain clinch
- !Tied in braided line
- !Pulled tight dry or fast, leaving the line crinkled
- !Turns crossed, so they press on one spot of the standing line
Crossed wraps before the improved tuck
Load on one turn; the tuck cannot save a messy stack
Improved clinch grip is parallel wraps plus the extra tuck · step 02
Stack never seated to the eye
Walks off under load
An unseated clinch does not lock, improved tuck or not · step 04
Skipped the improved tuck
You tied a plain clinch — slips on braid, weak on fluoro
The second tuck through the eye loop is why this is not a clinch · step 03
Final tension never locked the tuck
The improved pass sits open and unravels
Opposing tension after the tuck is the lock · step 04
Unwraps under load
Check
- ?Count wraps
- ?Confirm tag path
Then
- →Retie with 5–7 wraps
- →Use Palomar or Uni on braid
Wraps look uneven or reverse direction mid-coil.
Check
- ?Look for: Wraps look uneven or reverse direction mid-coil.
Then
- →Retie counting wraps; keep wraps stacked side-by-side.
Coil sits above the eye with a visible gap.
Check
- ?Look for: Coil sits above the eye with a visible gap.
Then
- →Wet, draw hard, and seat the coil flush to the eye.
Wraps cross over each other instead of spiral cleanly.
Check
- ?Look for: Wraps cross over each other instead of spiral cleanly.
Then
- →Retie keeping wraps ordered and parallel.
After fishing, the tag has worked back out of the coil.
Check
- ?Look for: After fishing, the tag has worked back out of the coil.
Then
- →Leave a longer tag and recheck after first fish.
Finished check failed — wraps stack or cross
Check
- ?wraps spiral neatly without overlap
- ?tag returns through both required openings
- ?coil slides fully to the eye during seating
Then
- →Retie. unraveling, slippage, or heat-damaged seating.
Crossed wraps before the improved tuck
Check
- ?Load on one turn; the tuck cannot save a messy stack
- ?Inspect step 02
Then
- →Retie. Do not dress a defective structure and call it seated.
Stack never seated to the eye
Check
- ?Walks off under load
- ?Inspect step 04
Then
- →Retie. Do not dress a defective structure and call it seated.
Skipped the improved tuck
Check
- ?You tied a plain clinch — slips on braid, weak on fluoro
- ?Inspect step 03
Then
- →Retie. Do not dress a defective structure and call it seated.
Same failure class, different geometry. Open the plates — Diagnose still starts from the symptom.
Not ideal for
- ×Braid terminals
- ×Maximum strength critical connections