Clinch Knot
Simple clinch · Basic clinch
A quick knot for tying a hook, lure or fly to mono or fluoro line, when speed matters more than the improved clinch's extra tuck. Not a knot for braid.
Finished structure
No drawing of this exact knot yet. The written steps are the reference.
- Diagram in reviewA drawing of the Clinch Knot itself is being made. Until then, follow the written steps.
Step 01
Push the line through the hook eye and fold the tag back alongside the standing line, leaving enough tag for the turns and the tuck.
No drawing of this exact knot yet. The written steps are the reference.
You should now seeTag and standing line lying side by side and pinched together a short way above the eye, with the hook hanging below.
If it goes wrongPulling too little line through the eye. The turns use it up and the tag is too short to tuck back through the loop above the eye.
Fix: Pull more line through the eye before you start. If the tag has already run short, undo the turns and begin again.
Why: Holding the tag and standing line together keeps the loop above the eye open while the turns go on.
- Diagram in reviewA drawing of the Clinch Knot itself is being made. Until then, follow the written steps.
Step 02
Wrap the tag around the standing line, moving away from the eye. Make about seven turns, at least five, and seven or eight on light line.
No drawing of this exact knot yet. The written steps are the reference.
You should now seeEven turns spiralling up the standing line, each next to the last, with a small open loop left between the first turn and the eye.
If it goes wrongLosing count, or letting the turns overlap as they bunch up. Too few turns let the knot pull out, and crossed turns do not close evenly.
Fix: Unwind and wrap again, counting each turn aloud and keeping light tension on the tag.
Why: The turns are what grip the standing line. Light line gets more of them because thinner line has less surface to hold with.
- Diagram in reviewA drawing of the Clinch Knot itself is being made. Until then, follow the written steps.
Step 03
Pass the tag through the small loop just above the eye, between the eye and the first turn.
No drawing of this exact knot yet. The written steps are the reference.
You should now seeThe tag coming out of the small loop right beside the eye, with the turns still loose along the standing line.
If it goes wrongTucking the tag into the wrong opening so it does not pass through the small loop right above the eye. When pulled, the turns unwind and the tag slides free.
Fix: Back the tag out and tuck it through the small loop beside the eye before pulling anything.
Why: This single tuck makes the plain clinch. A second tuck back through the large loop along the turns makes it the improved clinch.
- Diagram in reviewA drawing of the Clinch Knot itself is being made. Until then, follow the written steps.
Step 04
Wet the knot, pull it tight so the turns close down onto the eye, then trim the tag.
No drawing of this exact knot yet. The written steps are the reference.
You should now seeThe turns closed into a neat spiral seated on the eye, the tag coming out of the small loop, and a short trimmed end.
If it goes wrongPulling hard on dry line, or trimming before the turns have closed. The turns stay loose and can pull back open.
Fix: If the turns unwind as you pull, stop, check the tag is still through the small loop by the eye, wet the knot and pull again.
Why: Wetting cuts friction as the turns close, so they seat instead of heating the line.
Clinch Knot — finished-state checks, on the shared reference layout
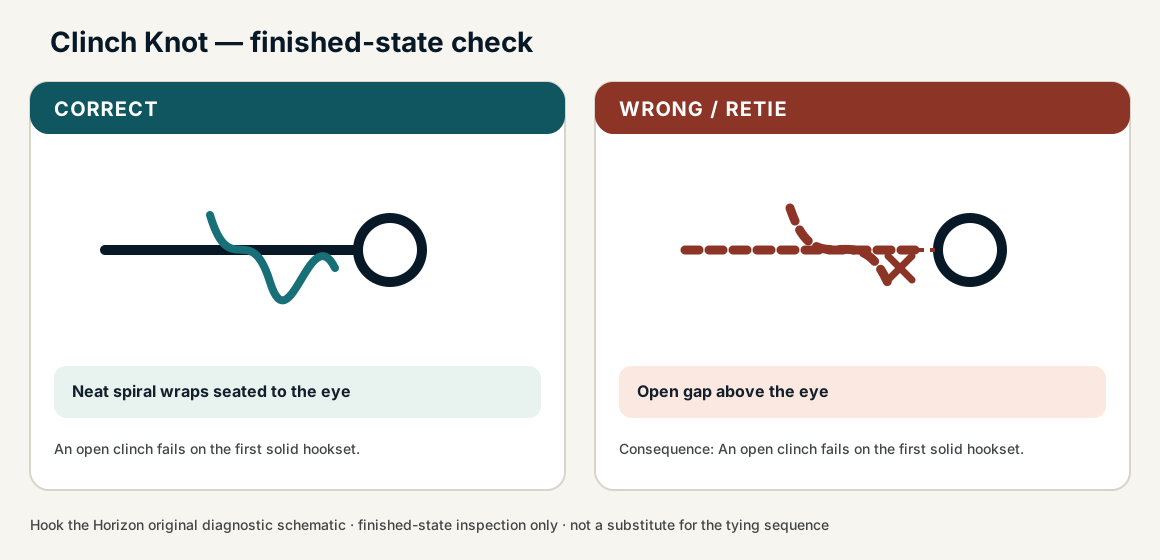
When this family fails, it fails as these. The recovered end still outranks the name.
Wraps down the standing part, then a tuck that jams the barrel to the eye.
- !Wraps walked or crossed — load on one turn of the barrel
- !Barrel never jammed to the eye, so the tuck is decoration
- !Tag never tucked, or the extra Improved / Trilene pass missing
- !Fewer than five turns, so the knot can pull out
- !Crossed turns that do not close evenly
- !Tag missed the small loop above the eye, so the turns unwind when pulled
- !Tied in braided line, where the clinch wraps slip
Uncounted or crossed clinch wraps
The usual pull-out
A plain clinch is wrap count plus the eye-loop pass, not a braid knot · step 02
Dry seat, or fished as if it were Improved
Slips on braid; glazes on fluoro
This is not an Improved Clinch and it is not a braid terminal · step 03
Tag never went back through the eye loop
Unwraps — the finish was skipped
The eye-loop pass is the clinch lock · step 01
Unwraps under load
Check
- ?Wrap count
Then
- →Retie with 5–7 wraps
- →Upgrade to Improved Clinch
Finished check failed — Open gap above the eye
Check
- ?Neat spiral wraps seated to the eye
- ?Tag exits cleanly without reverse wraps
- ?Coil remains closed after pull test
Then
- →Retie. An open clinch fails on the first solid hookset.
Uncounted or crossed clinch wraps
Check
- ?The usual pull-out
- ?Inspect step 02
Then
- →Retie. Do not dress a defective structure and call it seated.
Dry seat, or fished as if it were Improved
Check
- ?Slips on braid; glazes on fluoro
- ?Inspect step 03
Then
- →Retie. Do not dress a defective structure and call it seated.
Tag never went back through the eye loop
Check
- ?Unwraps — the finish was skipped
- ?Inspect step 01
Then
- →Retie. Do not dress a defective structure and call it seated.
Same failure class, different geometry. Open the plates — Diagnose still starts from the symptom.
Not ideal for
- ×Braid
- ×Maximum security (use Improved Clinch or Palomar)