Uni Knot
Duncan loop · Uni
Tying a hook, lure or other terminal tackle to braided or monofilament line. The barrel slides down to the eye, or stops short and locks to leave a small loop.
Finished structure
Drawn from a rope model of this knot: which strand passes over which comes from where the rope actually lies.
- 1Tag, back alongside2Standing line, to the rod
Move 1 of 1Pass the tag through the eye and lay it back alongside the standing lineYou should now see: Two strands side by side running up from the eye, with the tag reaching well past where the turns will go. Step 01
Pass the tag end through the eye and bring it back so it lies alongside the standing line, with plenty of tag to spare.
You should now seeTwo strands running side by side up from the eye, the standing line and the returned tag, with the tag reaching well past where the turns will go.
If it goes wrongLeaving too little tag. The uni uses a lot of line, and a short tag runs out partway through the turns.
Fix: Pull more tag through the eye now, before you start wrapping. Adding length once the turns are made means unwinding them.
Why: The turns in the next step go around both of these strands at once, so they need to lie side by side without twisting around each other.
- 1Loop over both strands
Move 1 of 2Turn the tag back over both strands to make a loop 1Five turns round both strands2The loopMove 2 of 2Wrap the tag five times round both strands, through the loopYou should now see: Five turns lying side by side inside the loop, each one around both strands, with the tag coming out beside the last turn. Step 02
Lay the tag back over the two strands to form a loop, then wrap the tag 5 or 6 times around both strands, passing it through the loop on each turn.
You should now see5 or 6 turns lying side by side inside the loop, each one around both strands, with the tag coming out beside the last turn.
If it goes wrongTurns crossing over each other, or a turn that goes around only one strand. Either shows as a lumpy, uneven row instead of a neat coil.
Fix: Unwind back to the first turn that is out of place and wrap again, keeping each turn beside the last and around both strands.
Why: Wrapping both strands inside the loop is what makes it a uni. As it tightens the outer turns move inside and the inner ones move out, so an even row closes into an even barrel.
- 1Barrel, clear of the eye
Move 1 of 2Wet the turns and pull the tag to close them into a barrel 1Barrel against the eyeMove 2 of 2Pull the standing line to slide the barrel down against the eyeYou should now see: A short, compact barrel with no open loop left inside it, sitting against the eye. Step 03
Wet the turns and pull the tag end to close them into a tight barrel. Then pull the standing line to slide the barrel down to the eye, or stop short to leave a small loop.
You should now seeA short, compact barrel with no open loop left inside it, sitting against the eye or at the loop size you chose.
If it goes wrongSliding the barrel before it is fully closed. It stops partway down the line, looks long or fat, or a loose turn stays inside and moves under a thumbnail.
Fix: Stop sliding, pull the tag again until the barrel is tight, then slide it down. If a turn has jammed out of line, cut it off and tie it again.
Why: Closing and sliding are two separate pulls. A barrel that is tight before it moves slides as one piece; a loose one drags turns out of place on the way down.
Move 1 of 1Give the standing line a firm pull, then trim the tagYou should now see: A barrel that stays where it is under a firm pull, with a short square tag pointing away from the line. Step 04
Hold the hook and give the standing line a firm pull to lock the barrel against the eye, then trim the tag to a short stub.
You should now seeA barrel that stays where it is under a firm pull, with a short square tag pointing away from the line.
If it goes wrongTrimming before the test pull, or trimming so close that the tag draws back into the barrel as the knot settles.
Fix: If the barrel moves on the test pull or the tag has pulled inside, cut the knot off and tie it again with a longer tag.
Why: For a loop knot, hold the barrel where you want it and pull the tag end firmly with less force on the standing line. That locks the barrel without sliding it down to the eye.
Uni Knot — construction sequence
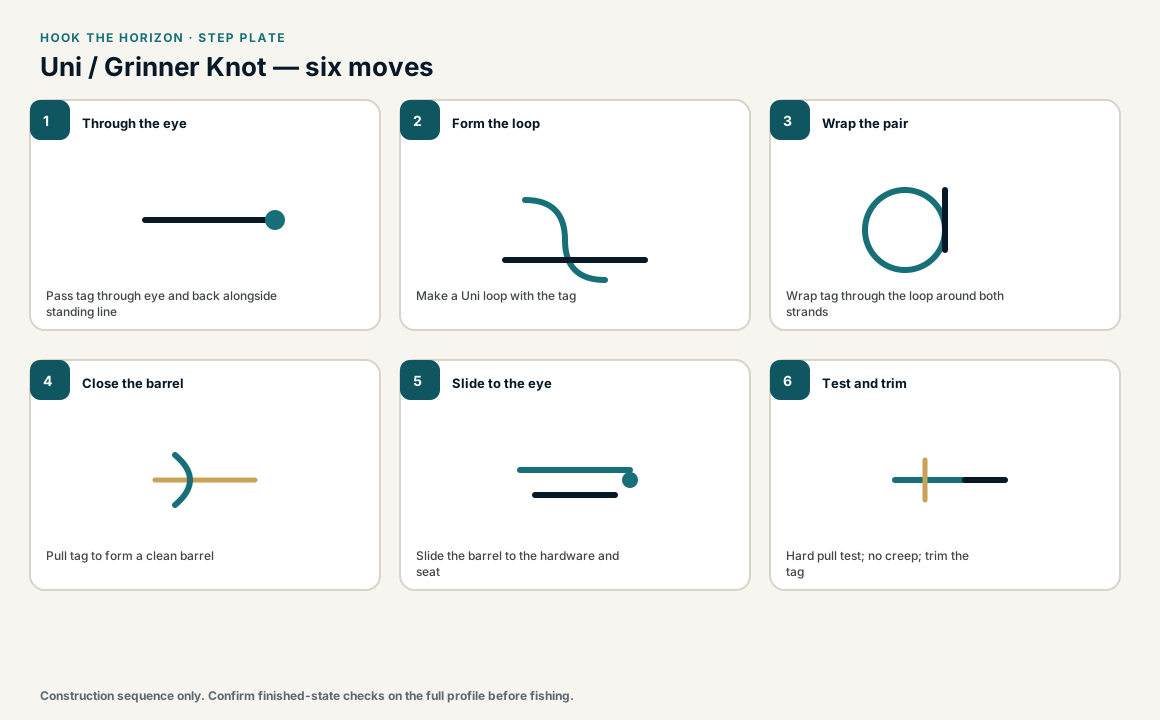
When this family fails, it fails as these. The recovered end still outranks the name.
Uni Knot — what fails and what to do
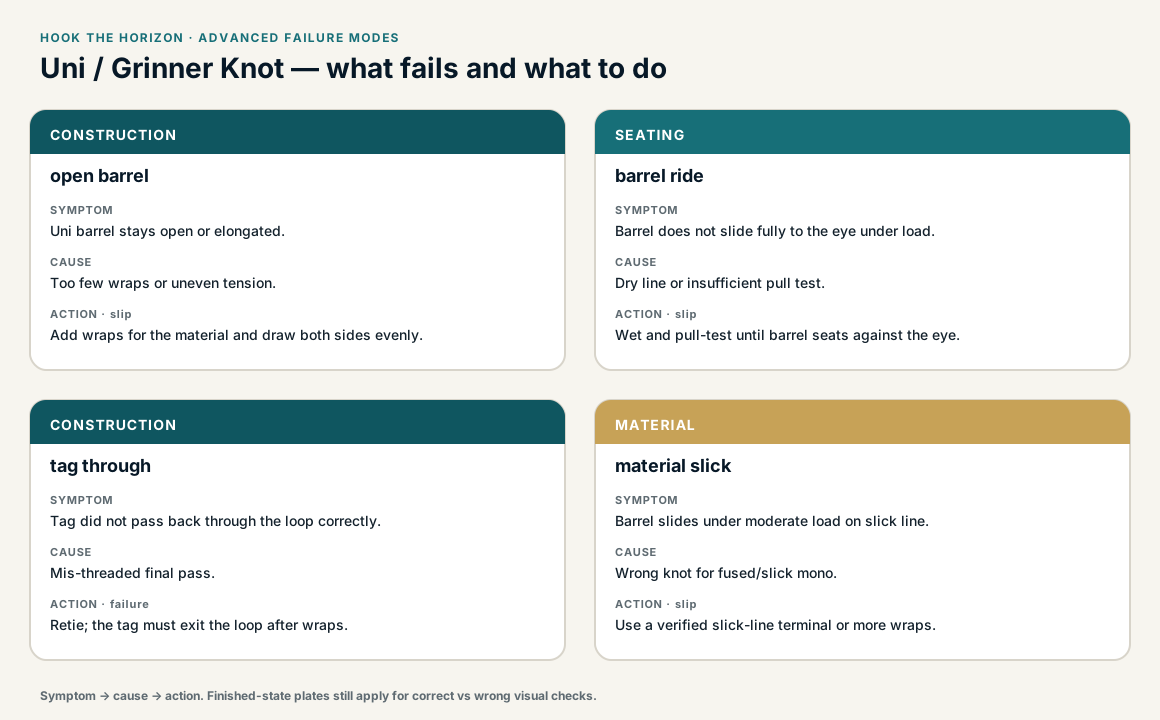
A barrel that is formed, then slid to the eye or the other barrel.
- !Barrel locked short of the eye or the other Uni
- !Crossed wraps in the barrel
- !Tag buried back into the barrel instead of exiting
- !Barrel slid down before it was closed, leaving a loose turn inside
- !Turns crossed, or a turn wrapped around only one strand
- !Tag trimmed so short it draws back into the barrel
- !Barrel not locked with a firm pull, so it moves on the test pull
Crossed Uni barrel wraps
Weak side; the barrel can slip
Uni grip is even barrel friction, then the slide to the eye · step 02
Barrel locked short of the eye
Hardware saws the standing line, or the Uni walks
Slide the barrel to the eye, then lock — not the other way around · step 03
Tag pulled back into the barrel
Unravels under load
The tag must exit after the barrel is formed, not bury in it · step 04
Barrel never locked after the slide
Will not hold
Final lock tension is the Uni; an open barrel is unfinished · step 03
Barrel slides or slips
Check
- ?Barrel butted to eye
- ?Wrap count
Then
- →Retie with more wraps
- →Lock firmly after sliding
Uni barrel stays open or elongated.
Check
- ?Look for: Uni barrel stays open or elongated.
Then
- →Add wraps for the material and draw both sides evenly.
Barrel does not slide fully to the eye under load.
Check
- ?Look for: Barrel does not slide fully to the eye under load.
Then
- →Wet and pull-test until barrel seats against the eye.
Tag did not pass back through the loop correctly.
Check
- ?Look for: Tag did not pass back through the loop correctly.
Then
- →Retie; the tag must exit the loop after wraps.
Barrel slides under moderate load on slick line.
Check
- ?Look for: Barrel slides under moderate load on slick line.
Then
- →Use a verified slick-line terminal or more wraps.
Finished check failed — barrel contains crossed wraps
Check
- ?wraps form a clean barrel
- ?barrel slides to the eye without crossing
- ?braid receives enough wraps and passes a hard slip test
Then
- →Retie. creep or sudden terminal failure.
Crossed Uni barrel wraps
Check
- ?Weak side; the barrel can slip
- ?Inspect step 02
Then
- →Retie. Do not dress a defective structure and call it seated.
Barrel locked short of the eye
Check
- ?Hardware saws the standing line, or the Uni walks
- ?Inspect step 03
Then
- →Retie. Do not dress a defective structure and call it seated.
Tag pulled back into the barrel
Check
- ?Unravels under load
- ?Inspect step 04
Then
- →Retie. Do not dress a defective structure and call it seated.
Same failure class, different geometry. Open the plates — Diagnose still starts from the symptom.
Not ideal for
- ×Must leave a free-swinging loop (use non-slip loop)
- ×When you need a standing free-swing loop at the terminal