FG Knot
Braid woven under tension around a tight leader so compression, not bulk, creates grip. Geometry-first connection — not a beginner field knot.
Advanced · Braid / Monofilament / Fluorocarbon
Connection card
FG Knot
For braid → leader.
Heavy leader straight; thin braid plaited over it as a sleeve; locking hitches at the end.
This card does not say how strong the knot is. A retention figure comes from a bench, in one material, at one diameter, tied by somebody who ties it all day — and the line in your hand is none of those. What it does tell you is whether the thing you have just tied is the thing the record describes.
What this plate is telling you
Braid woven under tension around a tight leader so compression, not bulk, creates grip. Geometry-first connection — not a beginner field knot.
Save this as a picture and it works with a dead signal and a nearly dead battery, which is when a joint is most often tied badly. The rest of this page — the steps, the seating sequence, the failure modes and the bench — is for the evening before.
Before you start
- ·Keep the braid tight the whole time. The sources hold it between rod and foot, over a knee, or between finger and thumb.
- ·The grip comes from tight braid biting into the leader from the first wrap. The half hitches stop the weave creeping.
- ·Weave to a length of about 1.5 to 2 cm rather than a set count: more wraps on light line, fewer on heavy.
- ·Animated Knots calls it somewhat complicated to learn. Try it at home before tying it on the water.
Step 1 of 4. Put steady tension on the braid by pinning the main line so it cannot move, then lay the end of the leader across the braid at a shallow angle.
Leader straight and under tension. Braid starts the plait.
Leader straight and under tension. Braid starts the plait.
swipe to step
01
Put steady tension on the braid by pinning the main line so it cannot move, then lay the end of the leader across the braid at a shallow angle.
A tight, straight braid with the leader crossing it close to the braid's tag end.
Letting the braid go slack. Wraps laid on slack braid sit loose, and the knot slips the first time it is loaded.
Fix: Pin the braid again so it stays tight, then start the wraps over.
Why: The FG holds because tight braid bites into the leader, and that grip is set from the first wrap.
arrow keys work
Tying procedure — FG Knot
step 01 · schematic Leader straight and under tension. Braid starts the plait.
Step 01 / 4
Put steady tension on the braid by pinning the main line so it cannot move, then lay the end of the leader across the braid at a shallow angle.
You should now see: A tight, straight braid with the leader crossing it close to the braid's tag end.
If it goes wrong: Letting the braid go slack. Wraps laid on slack braid sit loose, and the knot slips the first time it is loaded.
Fix: Pin the braid again so it stays tight, then start the wraps over.
Why: The FG holds because tight braid bites into the leader, and that grip is set from the first wrap.
step 02 · schematic Alternating weaves, each snugged before the next.
Step 02 / 4
Wrap the braid tag around the leader, alternating over and under, until the woven section is about 1.5 to 2 cm long. Use more wraps on light line and fewer on heavy.
You should now see: A tight woven section climbing the leader, each wrap snug against the last, with no leader showing between wraps.
If it goes wrong: A skipped alternation or a loose wrap. The weave looks fine until the first hard pull, then slides.
Fix: Unwind back to the last tight pair of wraps and weave on from there.
Why: The length of the weave matters more than a wrap count, because the right count changes with line diameter.
If wrong: Crossed lower FG wraps — Load concentrates and the weave slips off the leader.
If wrong: Leader exits off-axis through the jacket — Uneven compression; hinge risk.
step 03 · schematic Plait long and dense — no leader showing between weaves.
Step 03 / 4
Pinch where the lines meet so the weave cannot loosen, then tie 6 to 8 half hitches with the braid tag around both the leader and the braid.
You should now see: A row of half hitches locking the top of the weave, with the weave still tight underneath.
If it goes wrong: Letting go of the weave before the first hitches are on, so it spreads and loosens.
Fix: Push the wraps back together by hand before adding hitches. If the weave has opened up, weave it again.
Why: The hitches stop the weave from creeping. Without them the knot slips on the first hard pull.
If wrong: Lock hitches missing or walking — Unlock under cyclic casting load.
step 04 · schematic Locking hitches, then a finish hitch.
Step 04 / 4
Pull the braid and the leader hard in opposite directions. Trim the leader tag close, then tie 3 or 4 half hitches with the braid tag around the braid and trim it.
You should now see: A slim, tapered join, the leader tag cut close, and a short row of hitches on the braid above the weave.
If it goes wrong: Cutting tags before the hard pull, so a weave that would have slipped goes out on the water.
Fix: Pull hard before you trim anything. If the weave moves, cut it off and tie the knot again.
Why: The last hitches are braid around braid, which gives the join a smooth end to pass through the guides.
If wrong: Weave left loose — uncompressed leader will dump — Catastrophic slip under load.
Watch the tie
Easiest way to tie the FG Knot (braid to leader)Salt Strong · Opens on YouTubeExternal video from a creator we follow — not produced by us. Nothing on this page loads from YouTube until you follow the link.
Seating sequence — where failures are born
The step list compresses the finish. Run these phases in order, one at a time.
01 Moisten
Wet the plait before locking.
Leader stays loaded.
02 Load
Pull braid and leader against each other steadily.
Progressive, never sudden.
03 Dress
Slide the plait tight along the leader.
Held constant.
04 Set
Lock with half hitches, then load hard to prove the bite.
Full expected fighting load.
05 Trim
Trim leader tag close, braid tag slightly longer.
None.
Finished structure — what correct looks like
Heavy leader straight; thin braid plaited over it as a sleeve; locking hitches at the end.
Heavy leader straight; thin braid plaited over it as a sleeve; locking hitches at the end.
This schematic is the family shape, not a drawing of FG Knot on its own. The same drawing stands in for Yucatan Knot, Aussie Quickie, Bristol Knot, PR Bobbin Knot, GT Knot. Read the steps for what is different.
- ·Tight alternating braid weave compressing leader with clean lock hitches
- ·Fully compressed braid into leader surface
- ·Leader tag trimmed very short; braid tag short after locks
- ·Even wrap stack, no gaps
Verify before you load it
Every line is pass or fail. One fail means retie — do not load a knot you argued with.
- 01Tight alternating braid weave compressing leader with clean lock hitches
- 02Fully compressed braid into leader surface
- 03Leader tag trimmed very short; braid tag short after locks
- 04Even wrap stack, no gaps
- 05No accidental crossed lower wraps
- 06Lock hitches seated above solid transition
Field notes — dark, cold, gloves
- ·Not a knot to invent in the dark. Pre-tie leaders at home and carry them wound on foam.
- ·Cold hands lose braid tension before they lose grip — anchor the tag, do not pinch it.
- ·If it slips twice, the leader is too slick or too heavy for the braid. Change the pairing.
FG Knot — finished-state checks, on the shared reference layout
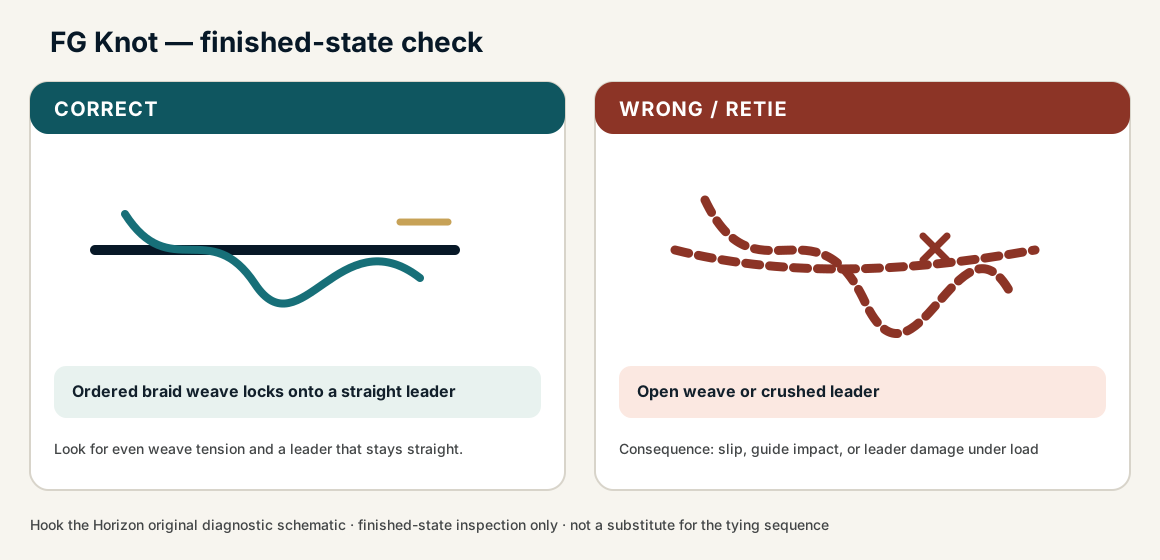
When this family fails, it fails as these. The recovered end still outranks the name.
FG Knot — what fails and what to do
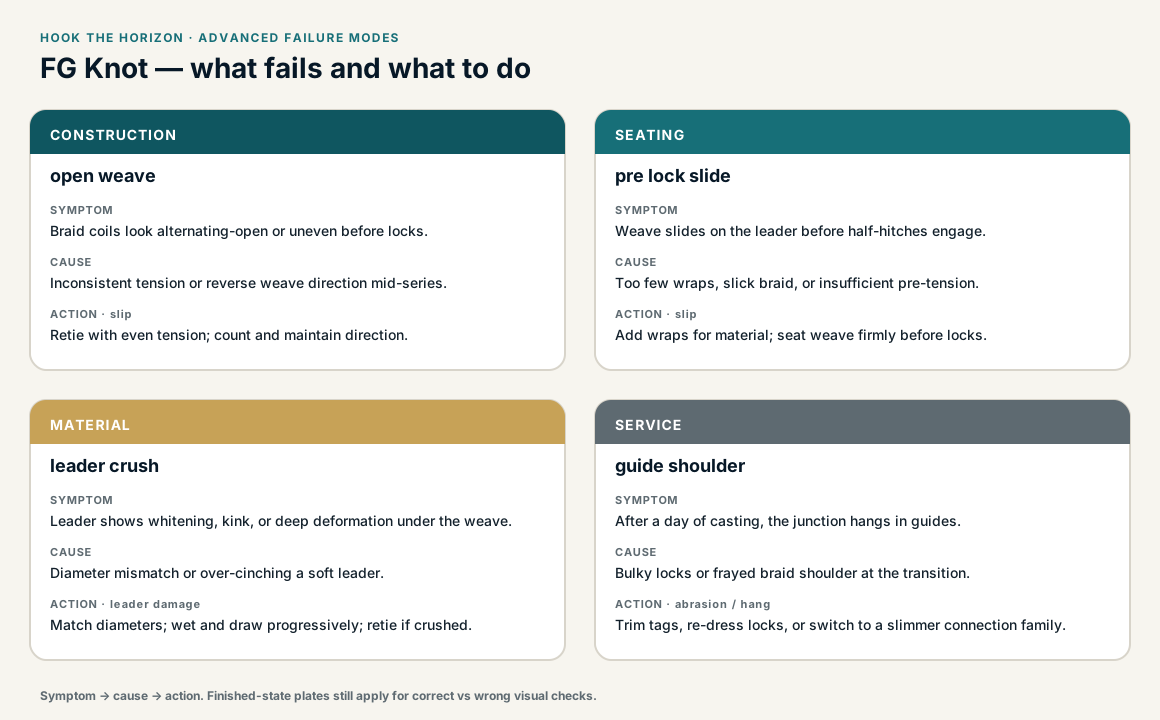
Braid wrapped onto a heavier leader, then locked so the join cannot hinge.
- !Hinge at the material transition — the join clicks, then parts
- !Wraps not packed on the heavier line before the lock
- !Lock or tag on the wrong side of the braid, so the column unzips
- !Braid slack while the wraps were laid
- !A skipped alternation or loose wrap in the weave
- !Weave not locked with half hitches
- !No hard final pull to tighten the weave before fishing
Crossed lower FG wraps
Load concentrates and the weave slips off the leader
FG is distributed braid compression, not a barrel you can bunch · step 02
Weave left loose — uncompressed leader will dump
Catastrophic slip under load
Incomplete seating leaves the leader uncompressed · step 04
Lock hitches missing or walking
Unlock under cyclic casting load
The finish hitches stop the weave from walking · step 03
Leader exits off-axis through the jacket
Uneven compression; hinge risk
Braid must jacket the leader on-axis · step 02
Braid slides off leader
Check
- ?Inspect for gaps in the weave
- ?Pull-test before fishing
Then
- →Retie under firm leader tension
- →Add wraps
- →Practice on the dock, not in a fish fight
Cannot keep wraps neat
Check
- ?Try with heavier practice braid first
Then
- →Use Alberto or Double Uni until FG is reliable
- →Build muscle memory with 20 practice reps
Braid coils look alternating-open or uneven before locks.
Check
- ?Look for: Braid coils look alternating-open or uneven before locks.
Then
- →Retie with even tension; count and maintain direction.
Weave slides on the leader before half-hitches engage.
Check
- ?Look for: Weave slides on the leader before half-hitches engage.
Then
- →Add wraps for material; seat weave firmly before locks.
Leader shows whitening, kink, or deep deformation under the weave.
Check
- ?Look for: Leader shows whitening, kink, or deep deformation under the weave.
Then
- →Match diameters; wet and draw progressively; retie if crushed.
After a day of casting, the junction hangs in guides.
Check
- ?Look for: After a day of casting, the junction hangs in guides.
Then
- →Trim tags, re-dress locks, or switch to a slimmer connection family.
Finished check failed — loose or alternating-open braid coils
Check
- ?braid weave is evenly tensioned around a straight leader
- ?locking half-hitches are compact and do not walk
- ?leader is not visibly crushed or kinked
Then
- →Retie. slip, guide impact, or leader damage under load.
Crossed lower FG wraps
Check
- ?Load concentrates and the weave slips off the leader
- ?Inspect step 02
Then
- →Retie. Do not dress a defective structure and call it seated.
Weave left loose — uncompressed leader will dump
Check
- ?Catastrophic slip under load
- ?Inspect step 04
Then
- →Retie. Do not dress a defective structure and call it seated.
Lock hitches missing or walking
Check
- ?Unlock under cyclic casting load
- ?Inspect step 03
Then
- →Retie. Do not dress a defective structure and call it seated.
Same failure class, different geometry. Open the plates — Diagnose still starts from the symptom.
Get it right with everything in your favour0/5 clean
Good light, dry hands, a table. Until the sequence is automatic here there is nothing for the harder rungs to test — you would only be learning that difficult conditions are difficult, which you already knew.
How · Tie it, check it against the list, log it. Five clean and the ladder opens.
Nothing marked. Log it clean, or mark what happened first.
Not ideal for
- ×Beginners needing a fast re-tie in wind
- ×Joining two similar mono lines (use Double Uni or Blood)
Strength, and where the number comes from
73.4% of the weaker line
Measuredone entrant's plain FG, 15 lb Spiderwire braid to 30 lb fluorocarbon leader, as a percent of the braid's measured unknotted break (34.4 lb) rather than its 15 lb rating — against the rating the same break would read far higher; the 'improved FG' variant, a different knot, took 80.9% light and 82.1% heavy
Strongest Fishing Knots Connecting Braid to Leader — Sport Fishing (Doug Olander)
Percentages come from published tests on their own line, their own knot-tyer and their own pull rate. Yours is a different system. Treat a figure as a reason to test, not as a result you already have.
- Animated Knots by Grog — FG Knot
Common offshore / inshore braid-to-leader practiceno link on file
- Sport Fishing Mag — Strongest braid-to-leader challenge results
Recovered from this record’s historical modelSourceId registry.
Record reviewed 2026-08-13
Vetted references
- FG Knot — Animated Knots
Animated Knots by Grog
- Easiest way to tie the FG Knot (braid to leader)
Salt Strong
Related knots
Check the finished knot against what correct looks like before you load it.