Haywire Twist
Single-strand wire to hardware. Both strands twist about each other symmetrically, then the tag lays barrel wraps up the standing wire and is broken off flush. The symmetry is the mechanism; a wrap around a straight strand pulls out.
Intermediate · Wire
Connection card
Haywire Twist
For line → hook, line → lure, line → swivel.
This card does not say how strong the knot is. A retention figure comes from a bench, in one material, at one diameter, tied by somebody who ties it all day — and the line in your hand is none of those. What it does tell you is whether the thing you have just tied is the thing the record describes.
What this plate is telling you
Single-strand wire to hardware. Both strands twist about each other symmetrically, then the tag lays barrel wraps up the standing wire and is broken off flush. The symmetry is the mechanism; a wrap around a straight strand pulls out.
Save this as a picture and it works with a dead signal and a nearly dead battery, which is when a joint is most often tied badly. The rest of this page — the steps, the seating sequence, the failure modes and the bench — is for the evening before.
Before you start
- ·This is for single-strand wire, not line. The wire holds the shape you bend into it, so there is no wetting or seating step.
- ·Cross the tag under the standing wire at more than a right angle before twisting. That wide angle lets both strands spiral around each other.
- ·Plan to remove the tag by bending it into a small handle and rocking it until it breaks. Cutting it leaves a sharp burr.
- ·Have spare wire ready. If the wire kinks or takes a sharp bend while you tie, cut it off and start again with fresh wire.
Step 1 of 4. Pass the wire through the eye, then cross the tag end under the standing wire so the two strands meet at more than a right angle. Hold the crossing with your fingers or pliers.
No drawing of this exact knot yet. The written steps are the reference.
swipe to step
01
Pass the wire through the eye, then cross the tag end under the standing wire so the two strands meet at more than a right angle. Hold the crossing with your fingers or pliers.
A small loop through the eye and two strands crossing in a wide X, each leaning well past a right angle to the other.
Letting the strands lie at a shallow angle, close to parallel. You find out when you start turning: the tag coils around a standing wire that stays straight.
Fix: Straighten the strands, open the crossing out past a right angle and start the twist again. If the wire has taken a sharp bend at the crossing, cut it off and use fresh wire.
Why: The wide angle is what lets both strands spiral around each other. From a shallow start one strand ends up wound on the other, and that pulls out under load.
arrow keys work
Tying procedure — Haywire Twist
- Diagram in reviewA drawing of the Haywire Twist itself is being made. Until then, follow the written steps.
Step 01 / 4
Pass the wire through the eye, then cross the tag end under the standing wire so the two strands meet at more than a right angle. Hold the crossing with your fingers or pliers.
You should now see: A small loop through the eye and two strands crossing in a wide X, each leaning well past a right angle to the other.
If it goes wrong: Letting the strands lie at a shallow angle, close to parallel. You find out when you start turning: the tag coils around a standing wire that stays straight.
Fix: Straighten the strands, open the crossing out past a right angle and start the twist again. If the wire has taken a sharp bend at the crossing, cut it off and use fresh wire.
Why: The wide angle is what lets both strands spiral around each other. From a shallow start one strand ends up wound on the other, and that pulls out under load.
- Diagram in reviewA drawing of the Haywire Twist itself is being made. Until then, follow the written steps.
Step 02 / 4
Keeping the crossing wide, twist both strands at the same time so each spirals around the other. Make at least three and a half full twists.
You should now see: Looking along the twist, both strands spiral around a shared centre, with at least three and a half crossings and no strand running straight through the middle.
If it goes wrong: Turning only the tag end, or letting the angle close as you twist. One wire runs straight with the other coiled around it, or you count fewer than three and a half crossings.
Fix: Cut it off and start again with fresh wire. Barrel wraps added on top will not turn a one-sided twist into a sound one.
Why: The grip comes from both strands bending around each other. When one strand stays straight, the other is only a coil sitting on it and can slide off.
If wrong: One strand wrapped around a straight one — Pulls straight under load and the leader is gone with no warning.
If wrong: Fewer than three and a half symmetrical twists — Not enough shared spiral to carry the load into the barrel wraps.
- Diagram in reviewA drawing of the Haywire Twist itself is being made. Until then, follow the written steps.
Step 03 / 4
Push the tag end until it stands at a right angle to the standing wire, then wind it around the standing wire about five times in tight barrel wraps, each touching the last.
You should now see: About five close coils sitting directly after the twists, with no gap between coils or between the first coil and the twist.
If it goes wrong: Winding the tag at a slant instead of at a right angle. The coils spread out along the wire and leave gaps you can see light through.
Fix: Unwind the gapped coils while the wire is still straight, push the tag back to a right angle and wind again. If the wire has kinked, cut it off and tie a new one.
Why: The barrel wraps stop the twists from unwinding. Holding the tag at a right angle makes each coil land beside the last one instead of spiralling away from it.
If wrong: Gapped or loose barrel wraps — The tag can work back and the twist can open.
- Diagram in reviewA drawing of the Haywire Twist itself is being made. Until then, follow the written steps.
Step 04 / 4
Bend the end of the tag into a small L-shaped handle, then rock the handle back and forth until the wire breaks at the last barrel wrap.
You should now see: The tag gone, with the break flush against the last barrel wrap and nothing sharp to catch a fingertip on.
If it goes wrong: Snipping the tag with cutters or pliers. That leaves a sharp burr you can feel with a fingertip, and it can cut a hand or nick the line.
Fix: If a burr or a stub is standing up, cut the connection off, tie it again and remove the tag by rocking the handle until it breaks.
Why: Rocking fatigues the wire right where it leaves the last wrap, so it parts there and leaves a smooth end. A cut leaves a burr at the cut instead.
If wrong: Cut tag leaving a spur — Catches hands, nets and leader; a reliable source of cuts.
Watch the tie
How To Rig Wire Leader - The EASIEST Haywire Twist TutorialReelReports · Opens on YouTubeExternal video from a creator we follow — not produced by us. Nothing on this page loads from YouTube until you follow the link.
Seating sequence — where failures are born
The step list compresses the finish. Run these phases in order, one at a time.
01 Form
Cross the strands steeply and twist both together.
None — this is shaping, not seating.
02 Wrap
Lay the barrel wraps tight against each other.
Firm hand pressure, no tools.
03 Break
Rock the tag until it parts flush.
None on the leader itself.
04 Check
Run the connection through a cloth and sight the wire for kinks.
None.
05 Commit
Only load it after the structure reads correct. Wrong means remake.
Working load, not a snatch.
Finished structure — what correct looks like
No drawing of this exact knot yet. The written steps are the reference.
- ·A symmetrical twisted section leaving the eye, running into tight barrel wraps on the standing wire
- ·Formed, not seated — wire holds its own shape
- ·Tag parted flush at the last barrel wrap, no spur
- ·Even symmetrical twists, then touching barrel wraps
Verify before you load it
Every line is pass or fail. One fail means retie — do not load a knot you argued with.
- 01A symmetrical twisted section leaving the eye, running into tight barrel wraps on the standing wire
- 02Formed, not seated — wire holds its own shape
- 03Tag parted flush at the last barrel wrap, no spur
- 04Even symmetrical twists, then touching barrel wraps
- 05Both strands cross each other throughout the twisted section
- 06Barrel wraps closed by a flush-broken tag
Field notes — dark, cold, gloves
- ·Wire tells you what it thinks of your technique immediately — a bad twist looks wrong before it is loaded.
- ·Any kink means the leader is finished. Single-strand wire fails there with no warning.
- ·Carry made-up traces. Building these on a rolling deck with a fish in the spread is not the moment.
Haywire Twist — finished-state checks, on the shared reference layout
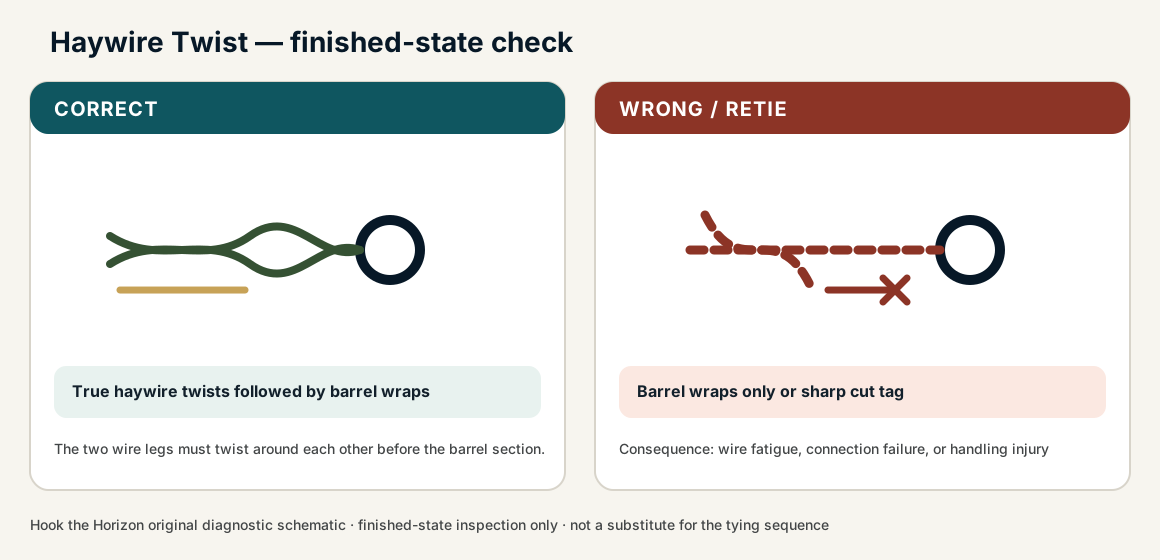
When this family fails, it fails as these. The recovered end still outranks the name.
Haywire Twist — what fails and what to do
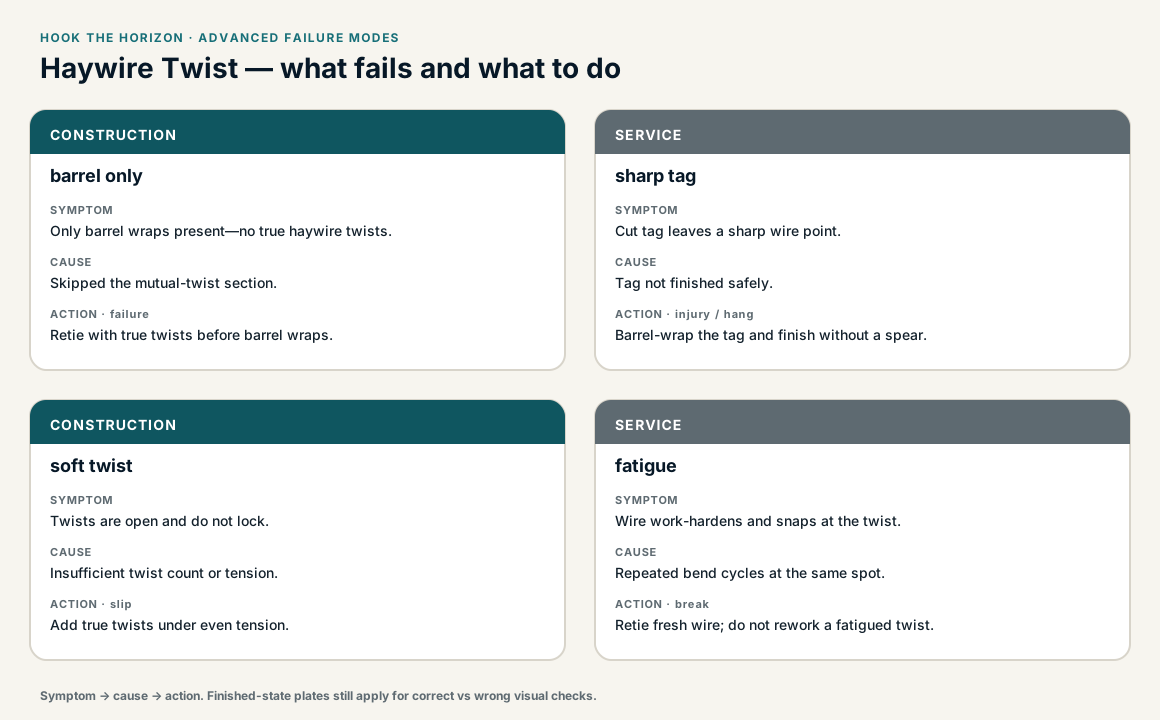
Single-strand wire held by its own permanent set, not by friction.
- !Strands crossed too shallow, so one wire wraps a straight one and pulls out
- !Too few symmetrical crossings before the barrel wraps start
- !Tag cut instead of broken, leaving a spur that finds hands and leader
- !Kinked wire reused — single strand fails at a kink with no warning
- !One strand runs straight with the other coiled around it, so the coil can slide off and pull out under load
- !Fewer than three and a half twists were made before the barrel wraps
- !The barrel wraps are gapped or spread out, leaving the twists free to unwind
- !The wire is kinked, from tying or from an earlier fish. Kinked single-strand wire is weak at the kink.
One strand wrapped around a straight one
Pulls straight under load and the leader is gone with no warning
A haywire holds because both strands spiral about a common centre. A wrap around a straight strand has nothing gripping it and simply unwinds. · step 02
Fewer than three and a half symmetrical twists
Not enough shared spiral to carry the load into the barrel wraps
The symmetrical section, not the barrel wraps, is what takes the strain. · step 02
Gapped or loose barrel wraps
The tag can work back and the twist can open
The barrel wraps close the twist; gaps let it breathe under cyclic load. · step 03
Cut tag leaving a spur
Catches hands, nets and leader; a reliable source of cuts
Rocking the tag until it fatigues parts the wire flush; cutters cannot. · step 04
Kink in the wire
Single-strand wire fails at a kink without warning
A kink is a permanent stress riser; the wire has already been damaged there.
One wire is straight and the other is wound around it
Check
- ?Look down the twist — both strands should spiral around a common centre
- ?A straight strand running through the middle means it is not a haywire
Then
- →Cut the section off and rebuild; a wrapped haywire pulls straight under load
- →Start with the strands crossed at well over a right angle
A sharp spur of wire stands proud at the end of the barrel wraps
Check
- ?Run the connection through a cloth — a spur will catch
Then
- →Break the tag by rocking it so it parts flush
- →If already cut, rebuild rather than trying to dress the spur
The leader has a kink or a tight bend near the twist
Check
- ?Sight along the wire for any bend that does not fair out
Then
- →Discard the leader — single-strand wire fails at a kink and gives no warning
Only barrel wraps present—no true haywire twists.
Check
- ?Look for: Only barrel wraps present—no true haywire twists.
Then
- →Retie with true twists before barrel wraps.
Cut tag leaves a sharp wire point.
Check
- ?Look for: Cut tag leaves a sharp wire point.
Then
- →Barrel-wrap the tag and finish without a spear.
Twists are open and do not lock.
Check
- ?Look for: Twists are open and do not lock.
Then
- →Add true twists under even tension.
Wire work-hardens and snaps at the twist.
Check
- ?Look for: Wire work-hardens and snaps at the twist.
Then
- →Retie fresh wire; do not rework a fatigued twist.
Finished check failed — only barrel wraps are formed
Check
- ?true haywire twists precede barrel wraps
- ?wire strands rotate around each other rather than one strand merely wrapping the other
- ?tag is fatigue-broken cleanly rather than cut into a sharp burr
Then
- →Retie. wire fatigue, connection failure, or handling injury.
One strand wrapped around a straight one
Check
- ?Pulls straight under load and the leader is gone with no warning
- ?Inspect step 02
Then
- →Retie. Do not dress a defective structure and call it seated.
Fewer than three and a half symmetrical twists
Check
- ?Not enough shared spiral to carry the load into the barrel wraps
- ?Inspect step 02
Then
- →Retie. Do not dress a defective structure and call it seated.
Gapped or loose barrel wraps
Check
- ?The tag can work back and the twist can open
- ?Inspect step 03
Then
- →Retie. Do not dress a defective structure and call it seated.
Get it right with everything in your favour0/5 clean
Good light, dry hands, a table. Until the sequence is automatic here there is nothing for the harder rungs to test — you would only be learning that difficult conditions are difficult, which you already knew.
How · Tie it, check it against the list, log it. Five clean and the ladder opens.
Nothing marked. Log it clean, or mark what happened first.
Not ideal for
- ×Mono, fluoro or braid — this is a wire-only structure
- ×Multi-strand cable, which wants a crimped sleeve instead
- ×Anywhere a kinked wire cannot be discarded and rebuilt
Strength, and where the number comes from
Not established
Called the strongest single-strand wire connection by NetKnots with no figure, and single-strand wire fails at a kink rather than at the twist, so a line-retention percentage would not describe it anyway.
Percentages come from published tests on their own line, their own knot-tyer and their own pull rate. Yours is a different system. Treat a figure as a reason to test, not as a result you already have.
- NetKnots — Haywire Twist
- BD Outdoors — Haywire Twist for single strand wire leader
- NetKnots fishing knot references
Recovered from this record’s historical modelSourceId registry.
Record reviewed 2026-09-01
Vetted references
- Haywire Twist
NetKnots
- How To Rig Wire Leader - The EASIEST Haywire Twist Tutorial
ReelReports
Check the finished knot against what correct looks like before you load it.