Loop-to-Loop Connection
Handshake loop · Loop-to-loop join
Joining two finished loops, such as a fly-line loop and a leader loop, so the leader can be changed without cutting either line.
Line-to-line · Beginner · Fly line / Monofilament / Fluorocarbon / Braid · 4 steps
ApplicationsHow to tie itFinished structure
No drawing of this exact knot yet. The written steps are the reference.
- Diagram in reviewA drawing of the Loop-to-Loop Connection itself is being made. Until then, follow the written steps.
Step 01
Run each loop slowly between finger and thumb, and look closely at the point where the loop is formed on each line.
No drawing of this exact knot yet. The written steps are the reference.
You should now seeBoth loops feel smooth along their length, and the point where each loop is formed is tight and undamaged.
If it goes wrongJoining to a loop with cracked coating or a frayed core. The damage shows as a rough spot, a kink, or a pale patch where the loop bends.
Fix: Cut off the damaged loop and make a new one before connecting. If the leader loop is the damaged one, tie a fresh loop in the leader.
Why: The finished connection is only as strong as the weaker of the two loops, and the connection loads each loop right where it bends.
- Diagram in reviewA drawing of the Loop-to-Loop Connection itself is being made. Until then, follow the written steps.
Step 02
Push the loop on the main line or fly line through the loop on the leader.
No drawing of this exact knot yet. The written steps are the reference.
You should now seeThe end of the main-line loop sticks out through the leader loop and stays open on the far side.
If it goes wrongDoing it the other way round and pushing the leader loop through the main-line loop. Finished that way, the leader loop ends up choking the main-line loop in a girth hitch.
Fix: Pull the leader loop back out and push the main-line loop through the leader loop instead.
Why: The main-line loop goes through first because the leader is the only part with a free end, and that end has to pass through the main-line loop next.
- Diagram in reviewA drawing of the Loop-to-Loop Connection itself is being made. Until then, follow the written steps.
Step 03
Feed the far end of the leader, tippet first, through the main-line loop and draw the whole leader through.
No drawing of this exact knot yet. The written steps are the reference.
You should now seeThe two loops hang linked but still loose, each loop passing around both strands of the other.
If it goes wrongPassing the leader through its own loop instead of the main-line loop. That ties the leader loop around the main line in a girth hitch, which looks tidy until it is pulled tight.
Fix: Pull the leader back out and feed it through the main-line loop, the one sticking through the leader loop.
Why: With each loop around both strands of the other, the two share the pull evenly. A leader passed through its own loop wraps one loop around a single bend of the other.
- Diagram in reviewA drawing of the Loop-to-Loop Connection itself is being made. Until then, follow the written steps.
Step 04
Pull the main line and the leader slowly away from each other until the two loops slide together.
No drawing of this exact knot yet. The written steps are the reference.
You should now seeTwo interlocked U-shapes of similar size lying flat against each other, looking like a square knot.
If it goes wrongOne loop cinching tight around the other while the other stays straight and open. That is a girth hitch, and it can cut into the loop it grips.
Fix: Push the loops apart, pull the leader back out, and repeat from step 2 with the main-line loop through the leader loop.
Why: A girth hitch puts the whole pull on one bend of the gripped loop. Undo it and connect again rather than fishing it.
Loop-to-Loop Connection — finished-state checks, on the shared reference layout
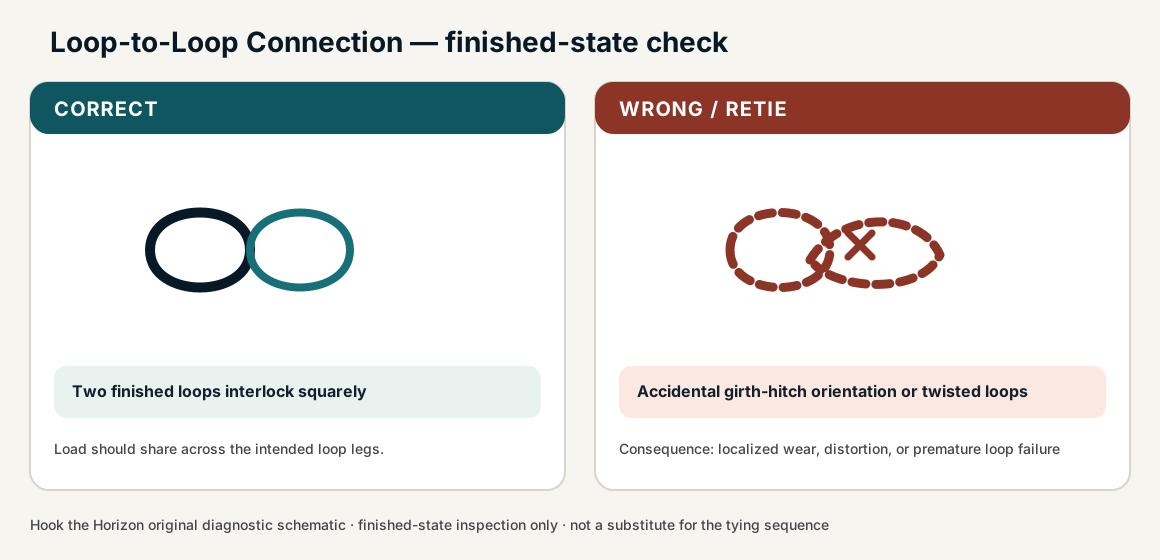
When this family fails, it fails as these. The recovered end still outranks the name.
Loop-to-Loop Connection — what fails and what to do
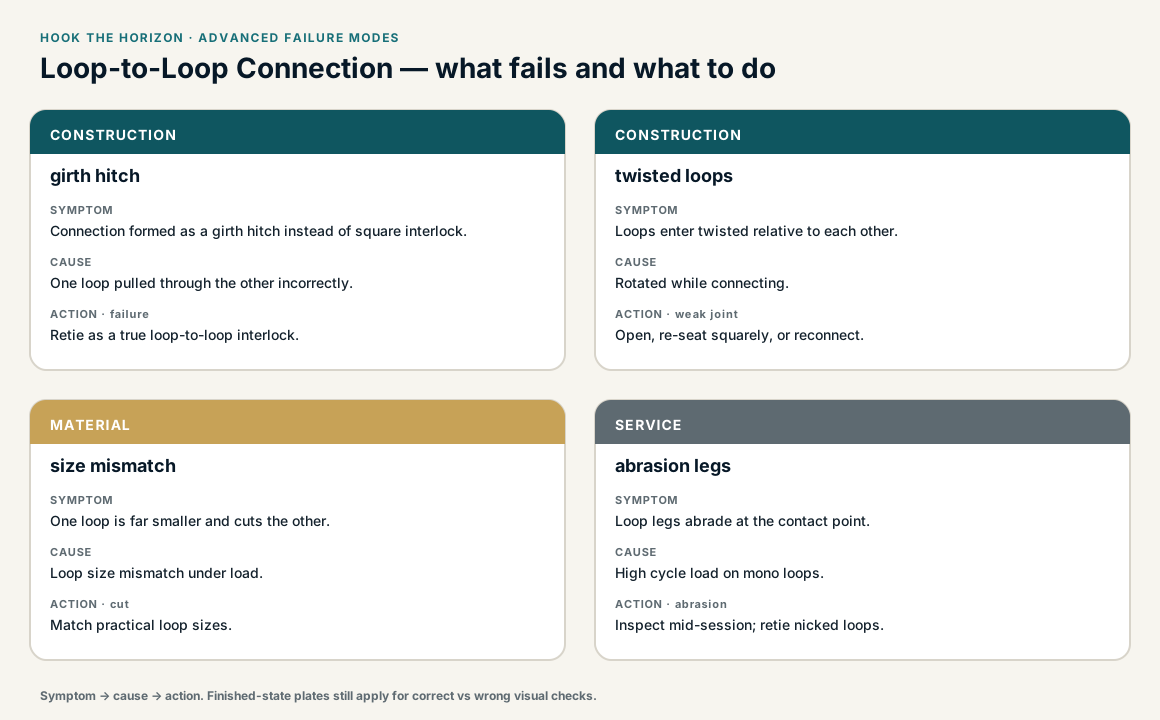
A loop that either stands as a dropper or handshake onto another loop.
- !Dropper loop collapsed into an overhand
- !Handshake twisted so one loop saws the other
- !Loop sized after it was already loaded
- !The loops finish as a girth hitch, putting the pull on one bend so it can cut the gripped loop
- !Either loop has cracked coating or a frayed core where it bends
- !The knot or join that forms either loop is loose or damaged
Assembled as a girth hitch
One loop cinches and cuts the other
Matching U-shapes only — a girth is a failed handshake · step 02
Oversized leader loop, or only the tippet through
Unfinished handshake; coating crushes
Both loops must pass fully and sit as a handshake · step 03
Factory loop already damaged
Crushed coating is a cut-off, not a retie of the handshake
Replace the loop; do not ‘fix’ a girth by pulling harder · step 01
One loop cinches and cuts the other
Check
- ?Matching U-shapes
- ?Neither loop collapsed
Then
- →Undo and reassemble as a handshake
- →Replace a damaged factory loop
Connection formed as a girth hitch instead of square interlock.
Check
- ?Look for: Connection formed as a girth hitch instead of square interlock.
Then
- →Retie as a true loop-to-loop interlock.
Loops enter twisted relative to each other.
Check
- ?Look for: Loops enter twisted relative to each other.
Then
- →Open, re-seat squarely, or reconnect.
One loop is far smaller and cuts the other.
Check
- ?Look for: One loop is far smaller and cuts the other.
Then
- →Match practical loop sizes.
Loop legs abrade at the contact point.
Check
- ?Look for: Loop legs abrade at the contact point.
Then
- →Inspect mid-session; retie nicked loops.
Finished check failed — one loop collapses into an accidental girth-hitch orientation
Check
- ?two finished loops interlock squarely
- ?load is shared across the intended loop legs
- ?connection can be separated without visible twist damage
Then
- →Retie. localized wear, distortion, or premature loop failure.
Assembled as a girth hitch
Check
- ?One loop cinches and cuts the other
- ?Inspect step 02
Then
- →Retie. Do not dress a defective structure and call it seated.
Oversized leader loop, or only the tippet through
Check
- ?Unfinished handshake; coating crushes
- ?Inspect step 03
Then
- →Retie. Do not dress a defective structure and call it seated.
Factory loop already damaged
Check
- ?Crushed coating is a cut-off, not a retie of the handshake
- ?Inspect step 01
Then
- →Retie. Do not dress a defective structure and call it seated.
Same failure class, different geometry. Open the plates — Diagnose still starts from the symptom.
Not ideal for
- ×Damaged factory loops
- ×When lowest profile matters (Nail / Needle)
- ×Girth-hitched assembly