Blood Knot
Barrel knot
Joining two lines of about the same diameter, such as sections of a fly-fishing leader or tippet, with matching turns on each side of the centre.
Finished structure
Drawn from a rope model of this knot: which strand passes over which comes from where the rope actually lies.
- 1Line A's tag end2Line B's tag end
Move 1 of 1Lay the two lines side by side with a long overlap, one running each wayYou should now see: Two lines lying parallel along a long overlap, each tag reaching well past the middle. Step 01
Cross the ends of the two lines so they overlap with the tags pointing in opposite directions, leaving each tag long enough for 7 turns and a tuck. Pinch the lines where they cross.
You should now seeTwo lines crossing in an X, held pinched at the crossing, with a long tag on each side.
If it goes wrongToo short an overlap. The second tag runs out before it has made the same number of turns as the first.
Fix: Start again with longer tags. Squeezing turns out of a short tag leaves one side with fewer turns than the other.
Why: The blood knot uses a lot of line, because the turns on each side gather in toward the middle as it closes.
- 1Five turns of A's tag round line B
Move 1 of 1Wrap A's tag round B's standing line five times, working away from the middleYou should now see: Five even turns of A's tag running outward along line B, with a gap left open where the lines cross. Step 02
Wrap one tag around the other line 5 to 7 times, working away from the crossing. Bring the tag back to the crossing and tuck it between the two lines.
You should now seeAn even spiral of turns on one side of the crossing, and the first tag passing through the gap between the two lines at the middle.
If it goes wrongTurns crossing or bunching, or losing count. You see a lumpy spiral, or later find one side has more turns than the other.
Fix: Unwind this side and wrap it again, counting out loud, then tuck the tag and keep it pinched in the gap.
Why: Animated Knots puts the strength of the blood knot in the turns: at least five, and up to seven, on each side of the centre.
- 1Five turns of B's tag round line A2The gap between the two sets
Move 1 of 1Wrap B's tag round A's standing line the same number of timesYou should now see: Two matching sets of five turns running outward from an open gap in the middle. Step 03
Wrap the second tag around the first line the same number of times, working away from the middle and winding in the opposite direction, so the two sides mirror each other.
You should now seeTwo matching spirals, one on each side of the middle, with the same number of turns and the first tag still sitting in the gap between them.
If it goes wrongMaking fewer turns on the second side, or winding in the same direction as the first. The two sides look different and the knot closes crooked.
Fix: Count both sides. If they do not match, unwind the second side and wrap it again in the opposite direction with the same count.
Why: Animated Knots describes the blood knot as a join for two lines of similar size, such as leader and tippet sections. Very different diameters close into an uneven barrel.
- 1A's tag, down through the gap
Move 1 of 2Bring A's tag back over its turns and pass it down through the gap 1B's tag, up through the same gapMove 2 of 2Pass B's tag up through the same gap, the opposite wayYou should now see: Both tags through the same gap in the middle, A's pointing down and B's pointing up. Step 04
Tuck the second tag through the same gap at the middle as the first tag, entering from the opposite side, so the two tags point in opposite directions.
You should now seeBoth tags passing through the one central gap, one going each way, with both sets of turns still in place.
If it goes wrongPushing the second tag through a different gap, or in the same direction as the first. The tags lie side by side pointing the same way instead of crossing.
Fix: Pull the second tag back out and tuck it through the first tag's gap from the other side before pulling anything.
Why: Tags that cross in the centre are each trapped by the other side's turns as the knot closes. Tucked the same way, both tags can draw back out.
Move 1 of 2Wet the knot and pull both standing lines slowly until the turns close up Move 2 of 2Trim both tags close to the barrelYou should now see: One even barrel, both halves the same length, with two short tags leaving the middle in opposite directions. Step 05
Wet the knot and slowly pull the two standing lines apart, so the turns gather in toward the middle and close. Trim both tags close.
You should now seeA symmetrical barrel with matching coils either side of the centre, the lines leaving it straight, and a short tag on each side.
If it goes wrongPulling fast on dry line, or letting a tag slip out of the centre gap. The barrel closes lopsided, bends at the middle, or the line looks crinkled.
Fix: If the barrel is lopsided, crinkled or bent at the middle, cut it out and tie it again. A closed blood knot cannot be reworked.
Why: As the knot closes the turns wrap around each other and change shape, which Animated Knots notes alters the look of the knot in nylon. A slow pull lets them gather evenly.
Blood Knot — finished-state checks, on the shared reference layout
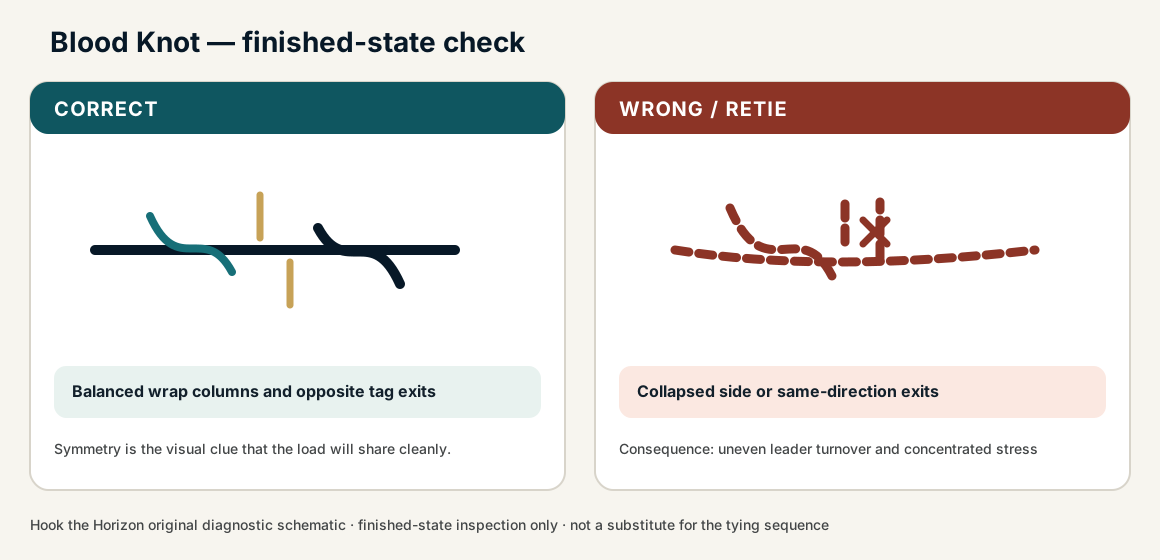
When this family fails, it fails as these. The recovered end still outranks the name.
Blood Knot — what fails and what to do
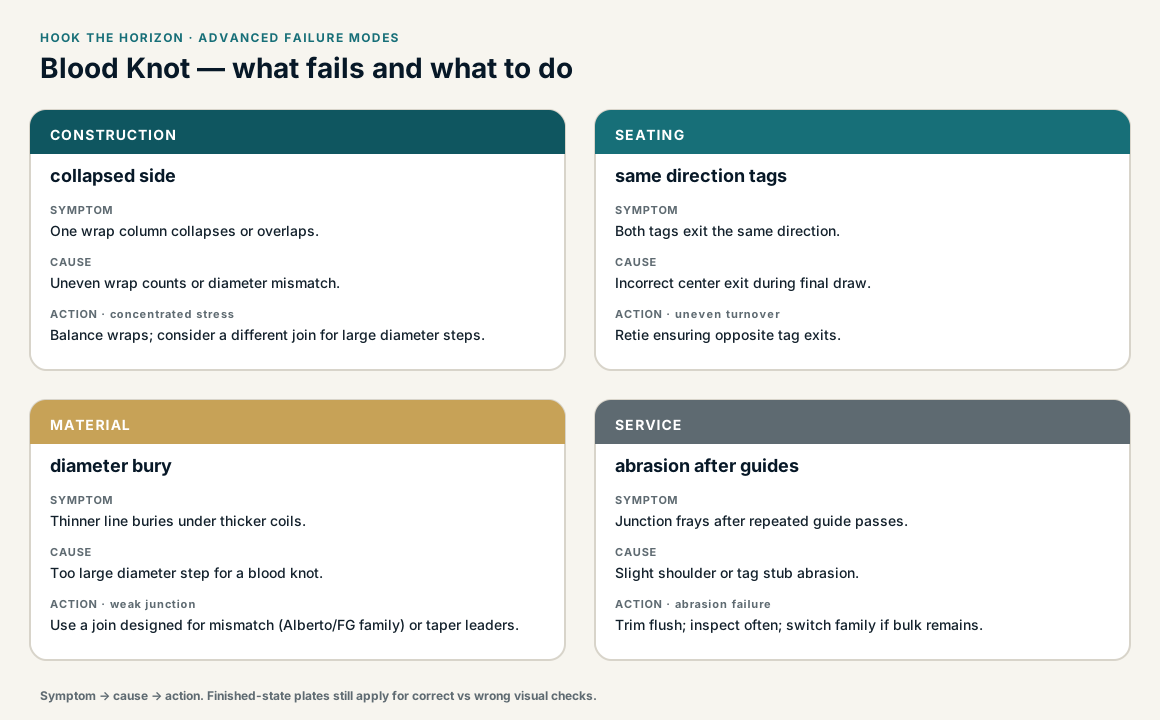
Symmetric multi-pass join of similar diameters.
- !Unequal wraps or a missed multi-pass
- !Ends not seated together — one side walks
- !Diameter mismatch turning the join into a hinge
- !Both tags tucked the same way, so they can draw back out of the centre
- !Fewer than 5 turns on a side, or unequal counts that close the knot crooked
- !Lines of very different diameter, which close into an uneven barrel
- !Pulled up fast on dry line, or a tag slips out of the centre gap as it closes
Unequal wrap counts on the two legs
Hinge that breaks at the join
Blood symmetry is structural — mismatch wraps are a different knot · step 02
Yanked instead of a slow standing-line seat
Fails in the barrel
A Blood forms under slow opposing pull, not a snatch · step 05
Tags not opposite through the centre
Will not form a Blood barrel
Opposite centre pass is the Blood; same-way tags are a twist · step 04
Hinge from a diameter mismatch or rushed seat
Breaks at the join
Blood is similar-diameter only; a hinge is a retie or a different family · step 05
Hinges or breaks at knot
Check
- ?Compare diameters
- ?Inspect barrel symmetry
Then
- →Use Double Uni for mismatched diameters
- →Retie with equal wraps
One wrap column collapses or overlaps.
Check
- ?Look for: One wrap column collapses or overlaps.
Then
- →Balance wraps; consider a different join for large diameter steps.
Both tags exit the same direction.
Check
- ?Look for: Both tags exit the same direction.
Then
- →Retie ensuring opposite tag exits.
Thinner line buries under thicker coils.
Check
- ?Look for: Thinner line buries under thicker coils.
Then
- →Use a join designed for mismatch (Alberto/FG family) or taper leaders.
Junction frays after repeated guide passes.
Check
- ?Look for: Junction frays after repeated guide passes.
Then
- →Trim flush; inspect often; switch family if bulk remains.
Finished check failed — one side has collapsed or overlapping wraps
Check
- ?two wrap columns are balanced
- ?center tags exit in opposite directions
- ?coils draw into a straight, symmetrical junction
Then
- →Retie. uneven leader turnover and concentrated stress.
Unequal wrap counts on the two legs
Check
- ?Hinge that breaks at the join
- ?Inspect step 02
Then
- →Retie. Do not dress a defective structure and call it seated.
Yanked instead of a slow standing-line seat
Check
- ?Fails in the barrel
- ?Inspect step 05
Then
- →Retie. Do not dress a defective structure and call it seated.
Tags not opposite through the centre
Check
- ?Will not form a Blood barrel
- ?Inspect step 04
Then
- →Retie. Do not dress a defective structure and call it seated.
Same failure class, different geometry. Open the plates — Diagnose still starts from the symptom.
Not ideal for
- ×Large diameter mismatches
- ×Braid-to-mono without modification